


It is impossible to look at Rodney's work and not leave inspired!
Can 3D prints really look like this?

They can if you have Rodney's talent for 3D modeling and finishing.
If you walk into Benson Elementary, you will see evidence that students are learning how to finish their own 3D prints.

Tye-Dye iPhone Holder for on a Tip-Up rod for Ice Fishing
(Easier to snap a photo of that trophy fish you catch)
(Easier to snap a photo of that trophy fish you catch)

This one shows the process from basic print prototype to final finished prototype.


This one was a design for an automated lunch tray conveyor.
The logo makes it much more impressive a prototype than plain plastic would have done. Even the little prototype lunch tray with half eaten apple and milk carton was painted to look authentic.
The logo makes it much more impressive a prototype than plain plastic would have done. Even the little prototype lunch tray with half eaten apple and milk carton was painted to look authentic.
Inspired by Rodney and his students, I asked Rodney why he is so passionate about teaching kids how to finish their 3D prints.
Why should a teacher care if a student's 3D print is finished?
3D prints that are not finished, with the obvious exception of purely functional or non visible parts like gears, handles, etc., represent only one stage of the rapid prototyping process.
CAD modeling takes skill and since we cannot print something without a file to print, of necessity, we have the student learn this stage.
For the most part, if a printer is in top form, it does all of the work in the second stage of prototyping.
For the third and final stage of producing a professional 3D prototype, one must learn how to take your prototype from "toy" to "Wow!" in order to impress clients. A plain vanilla print will not be sufficient in most cases. There is an old adage in the art/advertising world, "Never make your client work to figure out what the finished product will look like."
A 3D print from a student that is not finished is akin to a paper that had not been spell-checked and proofread.
There have been some people who have asked me if learning how to finish prints properly won't become an antiquated and unnecessary skill once 3D printers are capable of realistic multi-color prints.
I think not. The skills that the students are learning are not so much what glue works best or what paint is easiest to work with.
No, the skills that they are learning that will serve them well and transfer the most are
- eye/hand co-ordination
- being able to reproduce exactly what they are seeing through deep observation
- an understanding of the color scale and how lights and shadows work
- the ability to do exactly what you don't want your clients to have to do...visualize the finished piece in their mind
I'm so glad that Rodney has become part of the Create Make Learn community and is always so willing to share his talent with educators. We hope that you might join our community at our 6th annual summer institute to increase build your skills and confidence as a maker educator. Meanwhile, here are a couple of tips you can use today for finishing 3D prints from Rodney.
 These 3 non toxic materials can help you apply fine detail like grains of sand or pebbled reptile skin. Modeling such textures in a modeling program can be time consuming and may not end up printing well. To get a great textured look on your print try reflective glass beads, Elmer's glue, and acrylic or tempera paint.
Here are the 3 steps I use to create these effects:
Step 1: Spread a thin coating of Elmer’s Glue over the area that you want to have texture applied on your print.
Step 2: Sprinkle the glass beads over the glue and set aside to dry.
Step 3. Paint the dried textured area with your acrylic paints.


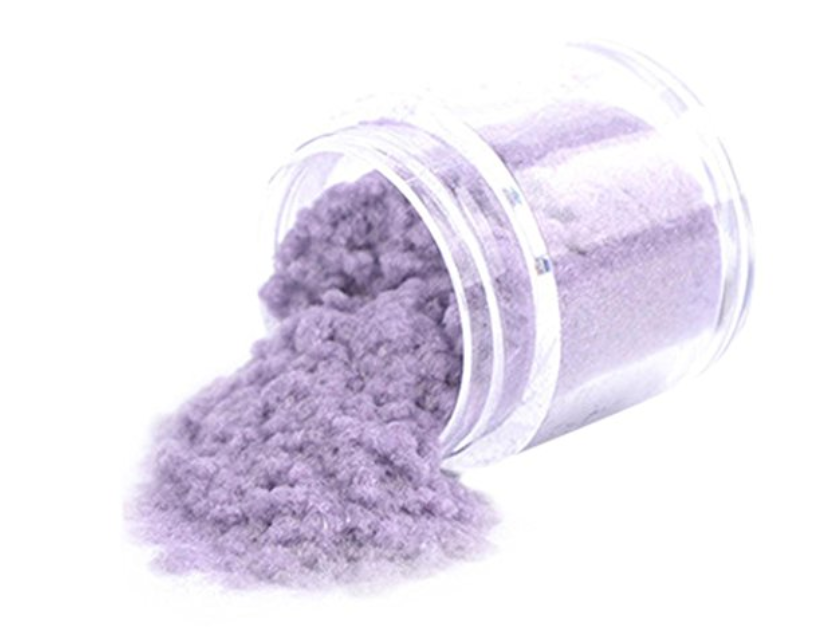
Flocking comes in many different colors, so if you want pink fur on your unicorn, have at it!
The technique is exactly the same. Spread thin coat of Elmer’s Glue, sprinkle or dip flocking and let dry for a great fur or hair look.
Here are some works where I use a combination of flocking and glass beads.

And one more fun tip!
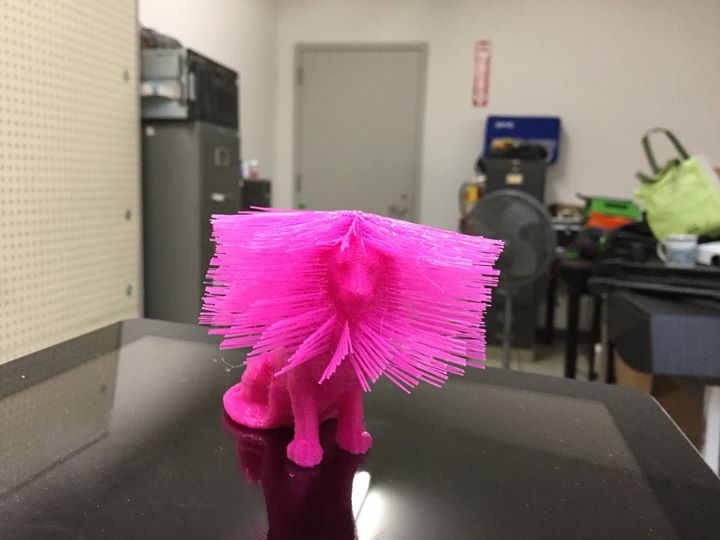
Actually, this is a new way to create a convincing hair texture on a model. The printer prints out a series of thin strands which result in the looks of the first photo.
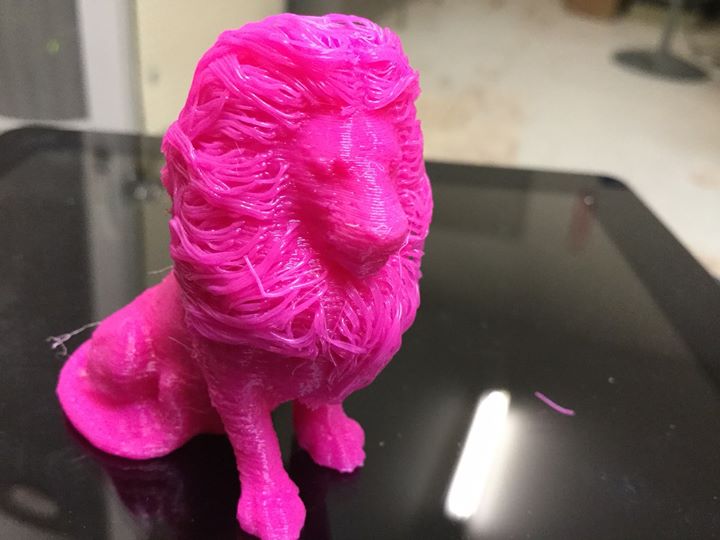 Then you dip the whole set of strands into some very hot water, (but not so hot as to burn you) and shape the now very flexible mass of strands into the look you see in the second photo. You instantly have a great hair texture that could take hours to achieve in a digital modeling program. It amazes me that a desktop printer can print strands as fine as that.
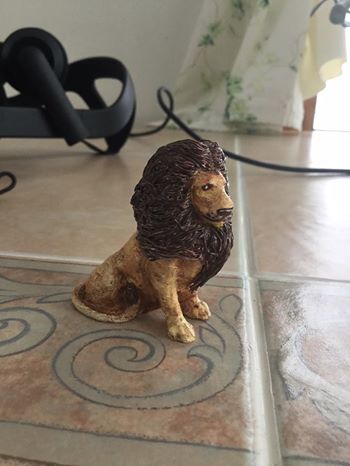
Here's the finished product!

I can't thank Rodney enough for sharing these tips and for being a part of our Create Make Learn community and for sharing his talents with us. Just the other day I fell in love with a piece that Rodney shared on his Facebook page, and quickly asked if I could order one. Just today as I was putting this piece together, I got a note from Rodney that my personalized piece of 3D printed art was ready! I can't wait to add this Butterfrog to my mini collection of maker art!
And if like me, you're wondering - What inspired the butterfrog? Here's what Rodney told me:
When I was a member of the Brandon Artists' Guild, I was always trying to come up with Vermontthemed paintings for the gallery. However, doing straight up renderings of haystacks, Adirondack chairs, and cows in a field has never really been my style (or my taste) I always tried to imagine something that I had never seen done in my travels to various galleries throughout the state.
I knew what the state butterfly was, also the state flower and state frog. These elements combined led me to paint the following. The official Vermont State Butterfrog. I still think we should have one. If Washington can have their sasquatch and Arizona their jackalope, we should be able to have our own cryptozoological specimen.

The painting inspired me to do a 3D rendering/print of it if I could.
The most challenging aspect of the modeling and printing was the wings. They needed to be as thin as I could get them. I experimented with different thicknesses until I got it right. I also printed the wings straight up with only the area that touches the body so that no support was needed. I ended up needing to print 4 of them so that each thin strip of plastic laid down could cool and solidify before the next was laid down on top of it. Otherwise, the wings became distorted.
These were printed on my Affinia 3D printer, with abs filament. They were smoothed with XTC3D and painted with Createx Airbrush paints.

3d scanning Vancouver, BC is doing magnificent staff. It utilized the light detecting technique to discover the intricacy inside the undertaking. It gives impeccable discoveries.
ReplyDelete