Subscribe to this blog to get new learnings ideas, discoveries, and inspiration from the CREATE MAKE LEARN community, along with updates about our upcoming Summer Institute and Workshops.
During Computer Science Education Week 2023, I challenged myself to learn to code with Turtle Stitch - a coding environment that allows you to generate code that can be embroidered with an embroidery machine! This fits right into my belief that Creating Code You Can Touch is a highly motivating way to introduce computer science. Today's post will include some getting started tips for beginners when using TurtleStitch for the first time.
If you have used Scratch, Snap, or other block coding environments before, you will notice that the layout to TurtleStitch includes 3 main areas.
On the left you will find a library of CODE BLOCKS, on the right you will find a STAGE with a TURTLE sprite (or actor) and in the middle is where you write your CODE to control the Turtle.
Let's get started by dragging out some Code Block to see if we can make the Turtle draw a Square.
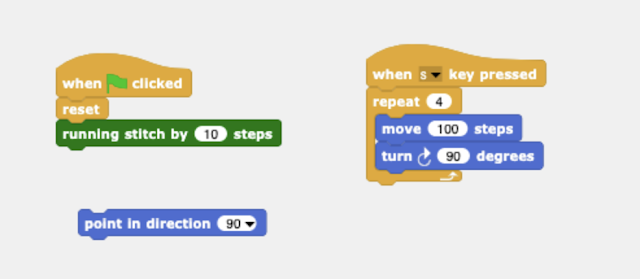
Tip 1:Start each program with a RESET. This clears the screen and returns the turtle to the HOME position and points it in the 90 degree direction. Then add a Stitch Type code by dragging out the Running Stitch Code. If you don't do this, Turtle Stitch will give you a warning that your stitches are too long for the embroidery machine. Putting both of these under a WHEN GREEN Flag block is a great way to make sure these commands are run at the beginning of every program.
Tip 2: I like to drag out an EVENT code that allows me to run part of my design when I press a key on my computer. In this case, I chose WHEN S KEY PRESSED (since we are drawing a square) then I attach code blocks that will tell the Turtle to Draw a Square.
Tip 3: Take some time to understand the X,Y Coordinates
One way to do this is to have TurtleStitch display the X,Y coordinates of your mouse pointer on the stage as well as the X,Y coordinates of the Turtle. I, also, like to display the direction that the Turtle is pointing.
To do this Find and "Click on "CHECKBOXES" for each of the following in the CODE BLOCK area.
Check these in the SENSING Category
When you do this, your Stage area will display location of your pointer and your turtle.
Moving the pointer around on the stage and watching the location info change can help you place your design elements in the correct elements on the stage. (Hint, You might have to drag the information blocks around the stage if they are stacked behind each other)
Tip 4: If you prefer to work in inches, change the Display Setting to inches. Keep the size of your design small enough to fit into the 4 X 4 inch or the capacity for your embroidery machine
The maximum image size for the Turtlestitch stage area is approximately 3 1/2 inches in height x 4 1/2 inches in width You can see the size of your image below the stage. I found that 127 steps created a 1 inch square
Tip 5: Try this fun challenge to better understand the X,Y positions of your grid and the size limitations of TurtleStitch graphics.
Create a design that draws and labels the XY Coordinate grid on the stage. Make it about 4 X 4 inch in size.
Use the code blocks we have learned along with these code blocks.
Here is the approach I took to do this. When GREEN FLAG pressed, reset and set a running stitch
When X pressed, draw the X axis and label it
When Y pressed, draw the Y axis and label it
When H pressed (move the turtle back home)
Bonus Challenge: Draw a one inch square in each of the 4 coordinates! `
Hope the following Tips prove to be helpful as you start your Turtle Stitch Journey.
I'm just learning too, so I welcome any advice as I share my journey in the next few posts.
Each year I challenge myself to learn something new and reflect on the process of that learning experience. I believe that taking off my teacher hat, and replacing it with a student hat, is one of the best professional development experiences a teacher can engage in.
I developed an interest in TurtleStitch when I saw Twitter posts about this platform that allowed you to CODE an embroidery design. This year, I decided that I would find a project that would allow me to create confidence with TurtleStitch so that I can include an embroidery machine in my Code You Can Touch experiences. I'm not quite finished my project, but here is what I have done so far, along with a reflection on what I'm learning along the way.
I like to approach learning through creating and making with four types of questions (What? How? Why? and Who?).
WHY would anyone use TurtleStich to create an embroidered design? WHO might TurtleStich invite and empower?
First of all, I must say you would NOT use TurtleStitch if your intention was to easily embroider a specific graphic. Many embroidery machine come with libraries of designs and fonts you can pick from. You can purchase embroidery designs on platforms like Etsy for a few bucks. You can, also, draw your own designs with embroidery design software or vector graphic software. Here's an example, where I used the free Inkstitch plugin to Inkscape to embroider the Create Make Learn logo.
But if your WHY is to learn to code through physical computing - then TurtleStitch fits the bill. If you enjoy block coding using Scratch of Snap, then TurtleStitch provides another block coding platform for you to play with.
It's accessible and can be used to create fun colorful designs on something you can TOUCH and KEEP! Giving birth to a physical object creates a feeling of pride and produces a reminder of the HARD FUN experience of learning to code!
Working with textiles can inspire under-represented populations to learn computer science. Students who are drawn to color, textile, or artistic expression might be more inspired to learn to code if the results was a physical product they could wear or display.
Inspired by my WHY and WHO questions, I was ready to move into the WHAT and HOW questions.
WHAT do you need to create an embroidery project with code?
Hardware - Obviously you will need access to an embroidery machine. I chose the Brother 525 for the following reasons.:
1) Price Embroidery machines are expensive. My goal was NOT to start an embroidery business, so I really did not need an expensive high end machine. I wanted something school makerspaces might find affordable. The Brother 525 (under $400) seemed to fit the bit.
2) Stand Alone machine. In my research, I kept seeing that combo machines (ones that sew and embroider) were less desirable and perhaps more prone to problems. I don't have personal experience with this, but it sounded reasonable, so I ruled out combo-machines.
3) Repair I would suggest looking around for a sewing machine repair shop near you to see what brands they will service. Embroidery machines perform a lot of mechanical movements, so I suspect that they might need to be serviced at some point.
4) USB port You will need to import your coded design into the machine, so you'll need a machine with a USB port.
Software
Since my goal was to create with code, my intention was to use Turtle Stitch software. It is cloud based so it works on Chromebooks and its free to use. It is based on SNAP block code, so the interface seemed familiar.
I also checked into embroidery software so I could embroider 'non coded' designs. I experienced sticker shock when I saw the price of embroidery software. Even the price of software plug-ins for vector programs like Adobe Illustrator seemed out of reach. After some research I noticed that I could use an Inkscape plug in called Inkstitch plugin to convert svg designs into a file format that my embroidery machine can use.
Supplies
It was obvious that I would need embroidery thread, but a few supplies were less obvious.
Embroidery Thread
I ordered this box to have a nice selection of colors available. Extra bobbins were also recommended, so I bought a box of these.
Extra Needles
Yes, even experienced sewers break needles, but a newbie like me broke a needle the first time I used my machine. I also learned that there are different needles for different fabrics and that you should replace your needles when they become blunt.
Hoops
Make sure you have the right embroidery hoop for your machine. This maximum embroidery size for my machine was 4" X 4" so I didn't really need the 3 pack with different sizes I bought.
Stabilizer
I tried my first design without stabilizer and it didn't work out so well. I had never heard of stabilizer before this project, but quickly learned that I would need both Tear away and Water soluble stabilizer depending on the type of project I had in mind. As the name implies, the water soluble stabilizer can be washed away with water and is useful for projects where the back of your project is exposed.
Tear-away Stabilizer
Water Soluble Stabilizer
Fabric
Having some scrap fabric that you can experiment on is important. You want to give yourself permission to experiment first! I used an old muslin shopping bag from Waby Parker to experiment with.
Since I didn't have quick access to a fabric store, so I purchased some flour sack tea towels for my first project. And since I was in the Christmas spirit, I also picked up some printed tea towels to use in my first project.
Sewing supplies
You'll also want some basic sewing supplies like scissors, rulers or tape measures, seam rippers, straight pins, a pin cushion, and an iron/ironing board.
HOW to get started?
The first step is to learn the basics of threading and operating your machine. For this I followed the instructions that came with my machine with one of the simple built in designs. I also found this video very helpful.
When it came time to code my own design, I wanted to start with something seasonal, but simple. A simple Christmas Tree proved to be the perfect design for me to get comfortable with the basics of TurtleStitch without feeling overwhelmed. The seasonal nature made it especially relevant and motivating to learn. It allowed me to become familiar with the ESSENTIAL setup code that every project needs. The design provided the perfect opportunity to review angles - a very important skill for coding embroidery designs.
I found that using an Event such as "When I press '__' to draw different parts of my design was helpful for troubleshooting.
I also learned that moving the turtle to a specific XY coordinate and resetting the direction that your turtle points to was key to predictable results.
In the next blog post on this topic, I'll break down the HOW TO steps with a more detailed tutorial for this project, and other starter projects than can help you and your students create confidence with code using TurtleStitch.
My experience has me re-thinking how and where I might use TurtleStitch in my physical computing approach to coding. There was a lot more 'non coding' pre-learning needed than I expected -- but I guess that would be true with any new medium. I'm definitely going to keep playing, and have the perfect holiday project in mind to motivate me to keep on learning through creating, making, and coding.
Graphics are used everywhere - from logos and icons to photographs and illustrations. Understanding the difference between vector and raster will help students choose the right format for their needs. As more tools for creating and making (such as laser cutters, electronic cutters, 3D printers, etc) become part of our educational. landscape, there is a need for learners to understand the difference between vector graphics and raster graphics.
What are Vector Graphics?
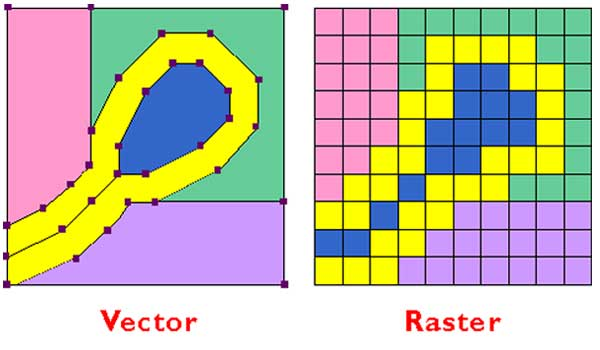
Vector graphics are made up of lines and curves defined by mathematical formulas rather than pixels - Common vector graphic formats include SVG, EPS, AI, PDF
.Vector Graphics are resolution independent; they can scale to any size without losing quality. They have a very small file size and load quickly on websites. They contain mathematical data that can be used to fabricate physical objects with laser cutters, electronic cutting machines, CNC machines, and 3D printer.
What are Raster Graphic?
Raster graphics are made up of a grid of pixels. Common raster formats include JPEG, PNG, GIF. They are very common and great for photo-realistic images. You can engrave raster images, but raster files cannot be cut.
Here is an example of raster and vector graphics
Professional software used to create Vector Graphics, such as Adobe Illustrator and Corel Draw, is often not availableto K12 students and teachers who want to create their own designs with maker tools.
Most schools needs design tools that
1) are affordable
2) work on Chromebooks
3) have a signed student data privacy agreement
Here are some options that can work for learners who want to design vector graphics that can be used in projects that use electronic cutters (i.e. Cricut or Silhouette), laser cutters, 3D printers, or large format printers.
Option 1: Search for and download an SVG graphic from the web.
Download an SVG file from web collection of vector graphic. My favorite is The Noun Project. If you create a login you can download SVG files and use them with attribution. They have a paid option with teacher discounts for those who would like to use the files without attribution.
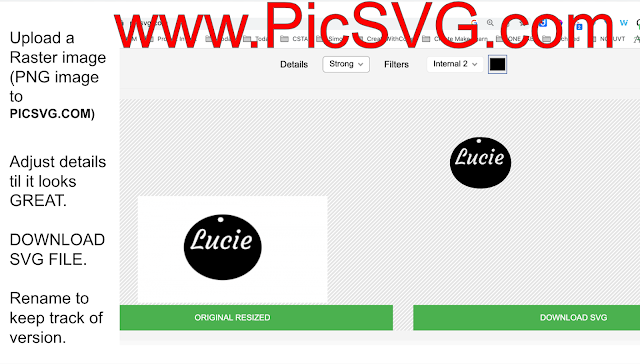
Option 2: Use an SVG converstion site to convert raster graphics into Vector Graphics.
Design or find a graphic file using one of many common tools that can save as a PNG or JPG. Upload it to a site such as PICSVG.org and convert the file to an SVG.
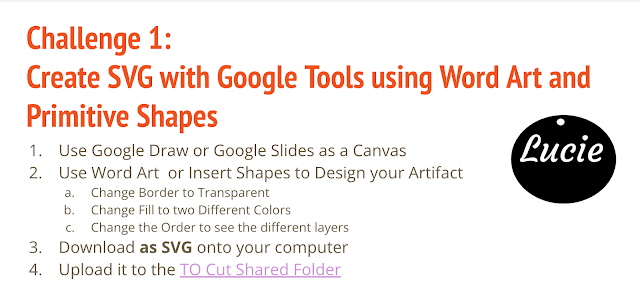
Option 3: Use Google Slides or Google Draw to create a SIMPLE SVG graphic.
UseWord Art and Shapes to create a simple SVG Graphic. (Unfortunately you cannot merge overlapping shapes, but there is a lot you can create with simple shapes and many fonts you can use with Word Art)
Did you see all the STEAM related events at VermontFest.
If you know anyone who is involved with Science, Tech, Engineering, Art, Mathematics or STEAM in any way at your school - have them check out the lineup of STEAM related sessions at Vermontfest
AOE will share their NEW STEAM Framework
followed by a round table session filled with educators who are interested in networking around STEAM or makerspaces
And lots of STEAM related sessions featuring robotics - from using LEGO Spike robots with young learners to playing with Edison Robots to advanced HS robotics
and for those of you who like hands on sessions - check out the six Make and Take experiences - where the room will be set up with six centers for self -exploration and a series of 30 minute guided experiences in each of the STEAM disciplines + computer science.
and of course, AI and computer science sessions fall in line with the STEAM theme.
And don't forget the STEAM coming from Vermont's best outdoor hot tub experience!
Vermontfest 2023 is going to be a stellar event for anyone interested in Science, Tech, Engineering, Arts, and Mathematics!.
When you think about STEAM projects in school, it's easy to imagine Science, Technology, Engineering and Mathematics; and in many STEAM projects, you'll find Art in the Mix. But at Bethel Elementary School, ELA teacher, Ms. Kathy Fechter, and her students used their STEAM projects to practice and grow proficiency in skills from their Language Arts curriculum.
Ms. Fechter adapted this Create an Eating Tool Challenge for her 4th and 5th grade students which proved to be an engaging way to introduce students to Design Thinking. Not only did the process integrate science and engineering standards, it also integrated English Language Arts skills such as writing, speaking and listening.
The Empathy stage of Design Thinking provided opportunities for students to practice active listening as they interviewed a partner to learn more about their favorite foods and challenges that occur when eating this food. The students used the information they gathered to Define the problem they wanted to solve based on the user's needs.
The students began to Ideate by sketching 3-4 possible ideas for an invention that would address the challenge.
In the next stage of Design Thinking, Bethel students used cardboard, tape, and recyclables to create a Prototype for an invention that would meet the needs of their user.
During the Test stage the students got feedback from their partner and others and reflected on how to improve their invention.
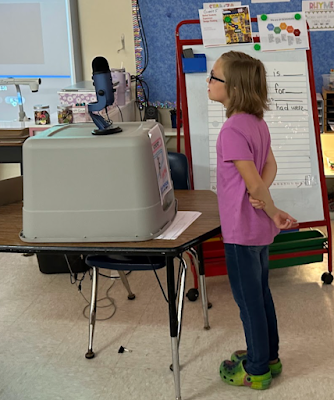
Finally it was time to Reflect on the process of learning design thinking by writing and collaborating on podcast episodes.
Listen to the first two episode of their podcast here, and stay tuned for more episodes next week along with more information about how we collaborated to create the podcast.
Observe and evaluate situations in order to define problems.
Frame questions, make predictions, and design data collection and analysis strategies.
Identify patterns, trends, and relationships that apply to solutions.
Analyze, evaluate, and synthesize evidence, arguments, claims, and beliefs.
Generate a variety of solutions, use evidence to build a case for best responses, critically evaluate the
effectiveness of responses, and repeat that process to generate alternate solutions.
Identify opportunities for innovation and collaboration.
Use a range of tools, including technology, to solve problems.
Persist in solving challenging problems and learn from failure.


.png)
.png)


.png)


.png)


.png)
