Saturday, March 30, 2019

Day 30 - Less Talking more MAKING to learn Design Thinking


Recently I overheard a group of teachers planning  a maker sequence and trying to figure out where to make space in the sequence to explain design thinking to the children.  I immediately was reminded of the times where I had spent too much time talking about design thinking instead of having the students experience design thinking and learning the stages by 'doing them. 


While designing a maker experience for  Beeman Elementary School, I  decided to spend less time TALKING about design thinking and more time integrating the concepts and language used in  Design Thinking into the maker sequence. But even though my goal was to  integrate design thinking language and practices into the maker event instead of spending lots of time talking about the different stages,  I still wanted the students to leave familiar with the stages and what they looked like.   Here is how I approached my goal.


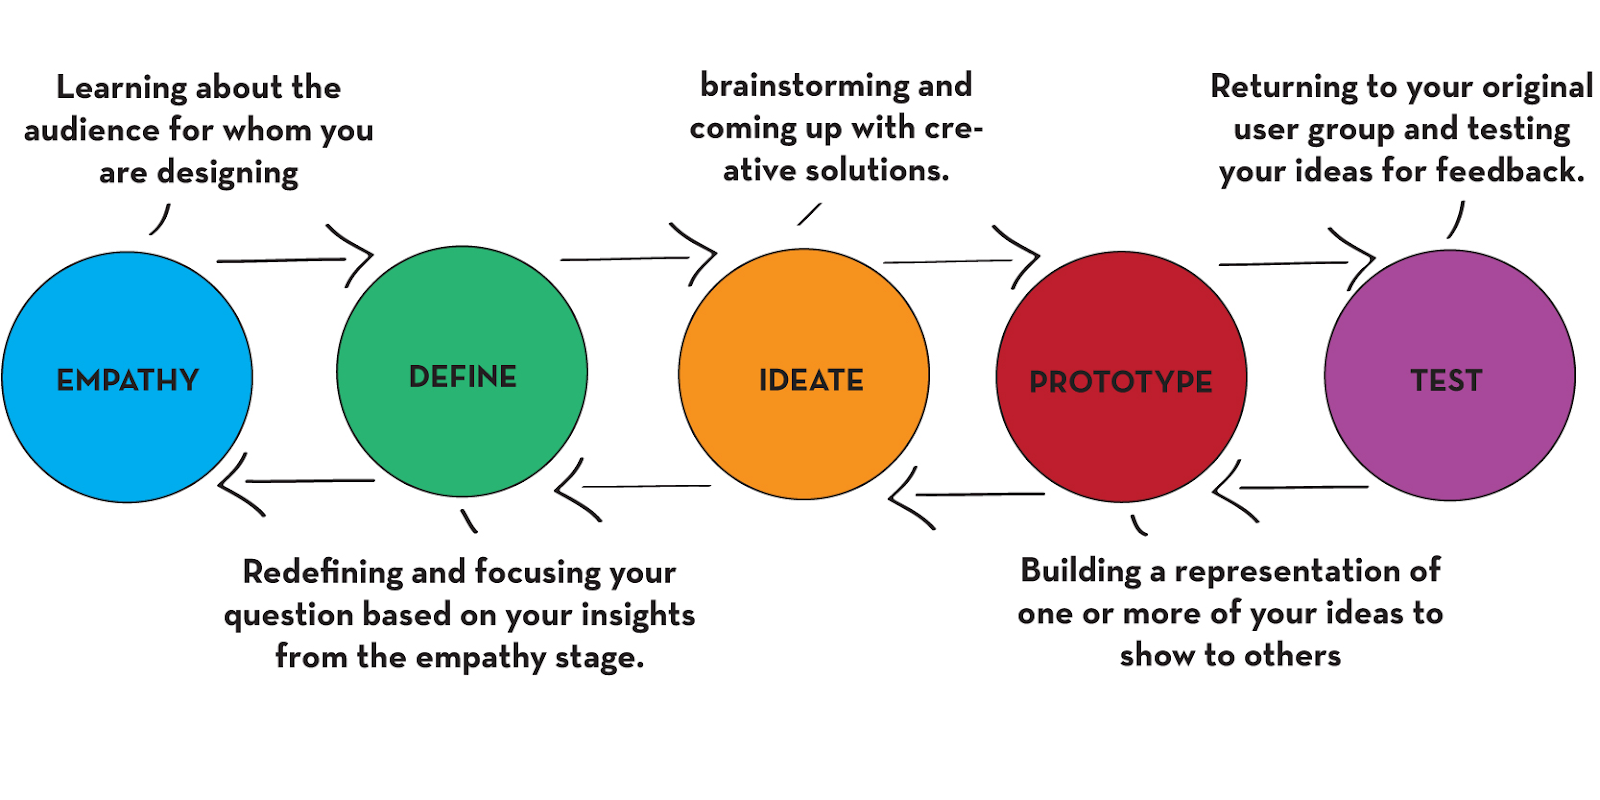
First I made a large poster of Design Thinking stages that also included examples of what each phase might look like.


Next I used each stage of the design thinking process to plan the sequence of  activities that I would lead students through.

In the case of this maker experience, I modeled using HOW MIGHT WE language  when I described  our goal for the day.


In our case they knew they were going to build a wind tunnel, but there was still room for the Empathy stage to learn more about who might be using the Wind tunnel they would build and what that interaction might look like.  YouTube is filled with videos you could use to increase empathy in this first stage of design thinking.    Here is the video I used to give student the opportunity to OBSERVE students using a Wind Tunnel.


EMPATHY stage:
  • Ask questions
  • Make observations
  • Gather information
  • Empathize: Understand the feelings, needs, and concerns of another


In our  Beeman Maker Event,  we used the following template to help each create a HOW MIGHT WE statement for the Wind Tunnel we were about to build.


DEFINE stage:


How Might We ____________________   (create/make/design)

For  _____________ (describe who you are making for)

That ____________ (what specific needs/wants do these users have)
That ____________  (will we be using a certain tool, process,  or improved system)
That  ____________ (constraints/ limitation - cost, material, time)


IDEATE stage

In the IDEATE phase, we asked the students to sketch some ideas for a protoptye they might build. Lots of stickynotes can be very helpful. They often think they are done and as facilitator use the word AND to try to get them to keep the conversation forward. Have the students share their ideas by posting the sticky notes on to wall or bulletin board and perhaps grouping like ones together.


PROTOTYPE stage:

 Next comes the fun part, where the students have access to tools and materials to build a prototyped.


TEST and Revise stage:

In the case of making our wind tunnel, the students got to observe several other classes test their newly constructed Wind Tunnel.

As we completed each of these steps I made sure to get some photos and videos of each stage, and then put together this short video for us to debrief.


As we watched the video together we were able to discuss the different stages of a design thinking and how each felt to them.

The next time you are tempted to 'lecture" ABOUT design thinking, consider leading students through an exercise where they will experience Design thinking and use visual clues around the room to help them name each stage that they just went through.

The more you use the design thinking protocol, name the stages, and compile evidence of each stage, the more your students will internalize the stages (and you didn't have to 'lecture"


\

Friday, March 29, 2019

Day 29: Adding Digital to an Analog Game with Scratch and Micro-controllers


Today we will continue with our series of posts on Creating and Making with an Earth Day Theme.


In our last game we designed a MAZE type  game in Scratch and then built a physical game controller using conductive materials, craft materials and a micro-controller board such as Makey Makey or FunKey.

Today's game will model creating an analog board type game and using Scratch and a micro-controller to add interesting elements to the  board game.

We'll also review how we used Design Thinking to guide the process.


The Earth Day Theme 2019 - Protect our Species allowed us to develop empathy for the needs of specific endangered species. The Earth Day sites provided lots of great information for the EMPATHY stage of design thinking.

Using the assumption that games can help motivate us, we can Define the game design problem using HOW might We language often found in the
DEFINE stage of design Thinking.


During the IDEATE Stage of design thinking we start brainstorm LOTS of possible ideas for a game that will meet our need to entertain in a way that will inform and persuade. Some ideas might include:
  • Maze Challenge
  • Board Game
  • Quiz Type Game
  • Physical Movement  Challenge

Finally its time to PROTOTYPE one of our ideas
Here are some things we considered during our prototype We picked a board game as our game type. The settings was in the ocean and the game pieces were sea turtles.

    We decided to use a color die to move our game piece through the game board. As the game piece landed on a color, new facts were revealed about our endangered species. After landing on a colored square, and listening to the fun facts, the player picks a challenge card what either adds or subtracts health points. The player tally's the health points when they reach the end of the path on the board. If they have positive health points they have escaped from Extinction. If they have negative health points they are on route to extinction. We decided to add fun sounds in Scratch to make the game fun and to add the ideas of multiple values for the health points to add an element of suspense and luck to the game.
    Here are some pictures of the prototype in progress.

    Creating a colored dice to move the game piece along.

    Playing with conductive elements that could trigger fun facts and fun sounds.

    We used Scratch to record and select sounds and informative audio to add to the game.


    After several iterations, we decided to use a brass brad and paperclip to create and open circuits, that would become a closed circuit when the game piece landed on each square.


    The paper clips were connected to copper tape which was in turn connected to the GROUND on the circuit board. Each brad was connected to a think strand of network wire, which was then connected to an alligator clip which was connected to the UP, DOWN, LEFT, and RIGHT pins on the circuit board.


    After lots of trial and error and changes to our plans, we were ready for the last stage - TEST and REVISE!
    We can't wait to try the game out with others and get ideas on how to revise and improve the game. The questions we have will be
    1) How did we inform you?
    2) What did we persuade you to do or stop doing?
    3) Was it fun?
    4) How might we improve our game?


    Thursday, March 28, 2019

    Day 28 - Meet Margaret - Maker / Welder Extraordinaire


    Today, I had the unexpected pleasure of meeting one of the most accomplished makers I’ve ever met. As she passed around examples of her work, I was in total admiration. I was so impressed, that I couldn’t wait to introduce her to you. 

    Take a look at these amazing bracelets, created by welder extrordinaire - Mararet Merigo (also known as Peggy Citerella). Margaret is about to turn 99 this June and was the first female rated welder in the Yard during World War II.


    Take a look at these bracelets she made during 'down time" at the Navy Ship Yard during World Ward II.


    Take an even closer look


    And now meet the maker behind these beautiful pieces!


    Margaret was working at a candy factory in the 1930’s making about $13.00 a week and was in search of a higher paying job. After a LOT of convincing she found her way to higher pay and even equal pay to what the men were making as welders in the Charlestown Navy Yard - (well until the war was over and the women were expected to give their jobs back to the men returning from war)


    Margaret Merigo was the first female rated welder in the Yard during World War II.

    Listen to Margaret speak about her bracelets, her welding career and even her perspective on women, welding, and aging well.


    This was one of these days, when you just have to stop and listen and appreciate the amazing people that live in our own back yard!  I hope you enjoyed meeting Margaret as much as I did, today.


    Wednesday, March 27, 2019

    Day 27: Adding an Earth Day Game Controller to our Earth Day Maze


    Yesterday we created a simple Earth day theme maze using Scratch.

    Today, let's add a fun game controller. 

    You'll need a circuit board like Makey Makey or FunKey  and some some alligator clips.

    You'll also need some recycled materials, craft material to work with.  Make sure you have some conductive materials to work with.  I used aluminum foil and copper tape as my conductive material.

    Since my game was to raise awareness about Sea Turtles and it primarily used the up, down, left, right arrow, I decided to make 4 sea turtles pointing in 4 different directions as my controller.

    After a few prototypes made mostly out of Amazon box type cardboard, I spotted a coffee cut holder in the recycling and to imagine turning it into sea turtles!


    Inspired by this coffee holder in my recycle bin

    I started to imagine a sea turtle 


    With the addition of a little color courtesy of Crayola


    I used  aluminum foil for shell pieces, and even used a sharpie to add color. 


    I used some copper tape to create a long  lead to the underside of the turtle's  aluminum foil 


    And cut a slit in the colorful sea scape background that
    I could thread the copper tape lead through.


    The copper tape leads ran under the seascape to the top edge of the paper,
    where I clipped 4 alligator clips that ran to
     a Makey Makey's UP, DOWN, LEFT, RIGHT pins connections


    I also created a version that connected the alligator clips to a 
    FunKEY board.  Both worked equally well for turning
    my crafty sea turtles into a Game Controller
    that moved my digital turtle through the maze.


    I was so excited to use my new sea turtles as controller that I started to imagine new features to my Earth Day based game.  

    In Version 2 below, 
    I  changed the color scheme to a sea colored blue
    I added a time element by adding music where the game finishes after the music is done
    I added a Game Over backdrop that appears after the game is over 
    I added a mystery element by hiding the sprites besides a closed door so you had no clue if the item behind the closed door was going to be help the animal escape from extinction until after you opened the door. 
    I also added point values to the different items that can count as health for the sea turtle.

    In future versions of the game I might add a scoreboard digitally, but for now we could manually calculate the health points or give out  physical 'cards' or 'tokens'  or 'stamps'. 

    Try this version of the game below . or  create a fun Earth Day themed controller and attached with a  circuit board  for even more Earth Day Fun. 


    Tuesday, March 26, 2019

    Day 26 - Creating an Earth Day Game - Maze & Controller


    During the next few days we'll go over a few different ways to approach creating a Earth Day themed game using physical computing.

    Let's start using Scratch to build our game and a circuit board such a Makey Makey or FunKey to build a fun controller for our  Earth Day themed game.


    Let's start with playing a game in Scratch, looking under the hood, and remixing it.

    With elementary students I would suggest starting with a simple maze type game  and then adding some interesting twist to your maze.

    For our example, I started by LOOKING INSIDE  this simple maze: https://scratch.mit.edu/projects/127482239


    1.  LOOK INSIDE, REMIX, and RENAME

    2.  Replace the ball in the EASY MAZE game  with a TURTLE
          Download a turtle icon or clipart image from a site like The  Noun Project
          You could also draw your own icon inside Scratch


       Select the ball Sprite
       Click on the Costume Tab
       Select UPLOAD Costume to import the turtle icon you have just downloaded
       Use the Zoom button to see all parts of your graphic
       Change the SIZE to a size that will make it easy for the turtle to travel through the maze.
       You may need to DRAG the turtle to a new location or use arrow keys to test the size
        Delete the ball costumes, as you no longer need those.


    3. Let's replace the bear with a jelly fish
        Download a jelly fish icon/clip art from a site like The Noun Project
        (you can also draw your own)

       Select the bear Sprite
       Click on the Costume Tab
       Select UPLOAD Costume to import the turtle icon you have just downloaded
       Use the Zoom button to see all parts of your graphic
       Change the SIZE to a size that fits inside the maze
       You may need to DRAG the bear to a new location
        Delete the bear costumes, as you no longer need it.


    4.  Let's change the CODE on our turtle so that when it touches the jelly fish it say's something different. 
         Rename both the sprites to turtle and jellyfish
         Change the 'say' block so the saying is 5 seconds and so it says something different. 


    5.  Let's add some sound effects to the Jelly Fish

        Select the SOUND Tab
        Pick a sound effect.  I chose Chomp.
        Select the CODE Tab
        Add the START SOUND command to your Code. 
        Change the Sound so it plays the CHOMP sound.
        I decided to add two Chomps. 


    If you'd like to add more options to your maze, you can download more icons or graphics and use the upload sprite button to add additional sprites to your game.  I chose to add a fish net, a plastic bag, and some coral.


    You can use the same steps listed above to add more sound effects and sayings for each new sprite. 
    Here is what my code looks like now! 


    You now have a simple Earth Day themed maze game that you can play using the arrow keys on your computer. 


    How might you  make your game a little harder or more fun by adding additional features?

    Tomorrow's blog  post will show you how to create a theme based  fun GAME controller for your game  made out of an OLD coffee cup holder!


    Turn this coffee holder into

    This Earth Day Theme  game controller
    for your Earth Day game! 


    Monday, March 25, 2019

    Day 25: The NOUN Project


    Today I'd like to share an amazing resource that I've found so helpful in creating and making - The NOUN Project!


    This site is filled with icons that can be used as part of your  maker projects (with attribution) . or for a small fee they can be used without Attribution. 
    See pricing information here: https://thenounproject.com/accounts/pricing/

    The site was primarily built for designers who wanted to search for or share icons to create a richer visual language by which to communicate.


    According to Wikipedia, the Noun Project started in 2010 with symbols that were in the public domain and with symbols from the National Park Series.   Since then it has grown through the contributions from around the world.

    Contributors can select to contribute their icons as public domain or through a Creative Commons attribution license, which means that anyone can use it free of charge as long as they provide credit.  You can also use the icon without attribution by paying a small fee.  The artist and the Noun Project split the fee.


    I've used the site to create physical objects such as vinyl decals and  laser cut projects

    These ornaments were designed using a variety of icons.


    I've also used The Noun Project to create sprites and other assets for Scratch game, presentations, and other digital projects.   I was able to quickly find just the right icons for a Scratch Project that was going to be part of our upcoming Earth Day Maker Project. 


    Sunday, March 24, 2019

    Day 24: Importance of Mentoring and Authentic Audience in Creating and Making


    Tonight I'm heading over to a club in Manhattan to hear some amazing Jazz Music from Mimi and the Podd Brothers.       A little over a year ago I got to sit in the audience of their creating their first LIVE album.


    What's even more special about this is that the two young men in the picture are my sons and I've had the privilege of watching them grow up as young creatives. 


    There are many factors that contributed to their success, but in today's post I'd like to talk about the importance of providing kids with  mentoring during their creative process and authentic audience for their creations.  And I can honestly say that the most amazing example of this that I've seen is a process that started when my children were in middle school -  The Vermont MIDI project - which has been renamed at Music Comp. 

    This project has been providing mentoring to students learning how to compose music starting in elementary school and throughout high school.  Throughout the process professional musicians mentor the students as they create new music using music composition software.   Twice a year Music Comp hosts an amazing authentic audience event called OPUS where the students compositions are played by real musicians and the students are introduced as the composers.

    This week will be the 34th OPUS concert - and if you want to witness the power of mentoring and authentic audience in the creative process -and you are anywhere near Montpelier Vermont -  you should definitely attend.


    Opus 34 - March 26th at Vermont College of Fine Arts in Montpelier

    At Opus 34 we will give 24 world premieres of music from students all across Vermont. Opus is an incredible day of music-making and a celebration of the creativity of our youth! The music our young composers have created will amaze you. They will never forget the moment they hear their music being performed live for the first time.

    The day starts with open rehearsals and workshops at 12:30 and the concert will begin at 6:30. All events are free and open to the public. Workshops will include a discussion for high school students on composing into college and beyond, and Evan Premo will give a workshop for all ages where he will perform John Deak's unforgettable piece for bass and voice BB Wolf and lead a group composition exercise.

    Opus 34 Facebook Event
     
    Opus 34 Composers
    Zane del Pozo, Ella Wilson, Lisa Zhou-Hackett, Brynna Swift-Herzog, Penelope deRosset, Jamie Maddox-White, Diya Kulkarni, Otis Starble-Murphy, Callum Robechek, Tatiana Byam, Jonah Sayler, Isabella Bledsoe, Drew Frankenberg, Miles Ellis Novotny, Nancy McNichols, Wanda Sullivan, Theo Novotny, Kyrsten Paroline, Alex Wick, Kai Williams, Jaron Rochon, Katharina Mueller, Alexander Beshay, Ethan Duncan

    Saturday, March 23, 2019

    Day 23 - Entrepreneurship at the KES Makerspace


    Today, let's take a peek into the maker space at Killington Elementary and listen to Eileen Vaughn talk about her school's makerspace.


    Excerpts from Interview with Eileen Vaughn


    One of the favorite tools in the makerspace is the Cricut Maker.  Eileen was inspired with the Cricut at the 2018 Create Make Learn Summer Institute and brought one back to her school. She started working with a teacher on a Flag project, and before you know it, the sixth grade students and their teacher became inspired and started to use the Cricut to create personalized items with the KES insignia (Killington Elementary School).


    The sixth grade created a school store where they created their own merchandise, including mugs, bookmarks, stickers, earrings, keychains, and more.


    The Cricut Maker became such a heavily used tool, that the PTO ended up purchasing two more Cricut


    Their teacher, Amy Simonds,  saw this project as a real opportunity for students to develop both transferrable skills and content area skills, especially in mathematics. The students developed prototypes, determined material needed, made the merchandise, and determined the cost and price points.


    It is amazing to watch the students use critical thinking and problem solving skills, communicate and collaborate with each other, and be self directed — definitely the types of skills that can best be taught with authentic, real world learning opportunities. 


    And it's not just the teachers who think makerspace  is a fun way to learn.   The students think so, too!


    Student Quotes