Showing posts with label #glowforge. Show all posts

Tuesday, November 1, 2022

Code You Can Touch using laser cutter or vinyl cutter

 In this post I continue to advocate for creating using Code You Can Touch.  

In the previous post, we used Makey Makey and Scratch to make physical objects interactive by adding the ability to generate fun sounds when you interact with them.

In the next few posts, we will actually CREATE a design using ALGORITHMS and then use MAKER tools such as laser cutters, vinyl cutters, or 3D printers to MAKE a product that uses the design that we CODED. 

Let's start with  coding designs that you can use with cutting tools.  I happen to have a Cricut Maker and a Glowforge laser cutter in my maker-space, but you can use this workflow with any maker tool that imports SVG (vector files).  In the next post, we'll play with 3D printers.

Imagine wearing earrings that you created with code or sporting a shirt or some jeans that have a design that you created with code.  Could your night light include a design you created with code.  The possibilities are endless. 

But first let's  briefly examine WHY you would want to to CODE a DESIGN instead of draw one or download one from ETSY. 

Of course, one reason is to develop skills in computational thinking.  Others might find this approach an introduction to computer science or learning to code.  Each of these are different but related and all value the transferable skill of creating and understanding algorithms.  This brief video from Digital Promise does a great job describing the importance of computational thinking in our computational world.


I would also consider creating physical objects with code to be an inclusive pedagogical strategy.  Digital Promise describes inclusive pedagogy as  
"engaging all learners in computing, connecting applications to students’ interests and experiences, and providing opportunities to acknowledge, and combat biases and stereotypes within the computing field."

If we want to change the Dave to Girl Ratio we must create opportunities for under-represented populations to create confidence and interest in tech and computer science.  Creating beautiful and colorful objects that you can 'touch and feel' is one way to engage a broader audience with computer science.


The Cricut Maker was a popular choice during TechSavvy Girls Camp 2018

I would not advocate that Coding a Design is the only way  (or best way) to produce artifacts with maker tools.  It's just ONE way.  But it does provide a way that engages students in the learning process with HARD FUN. 

Engaging students with fun does not have to be 'make it easy".  Seymour Papert dedicated his career to creating environments that included hard fun.  

Once I was alerted to the concept of "hard fun" I began listening for it and heard it over and over. It is expressed in many different ways, all of which all boil down to the conclusion that everyone likes hard challenging things to do. But they have to be the right things matched to the individual and to the culture of the times. These rapidly changing times challenge educators to find areas of work that are hard in the right way: they must connect with the kids and also with the areas of knowledge, skills and (don't let us forget) ethic adults will need for the future world.   ~ Seymour Papert

Learning through Hard Fun while coding, creating and making is a great way to help students develop the growth mindset that can change the way they learn across all content areas. Carol Dweck and Jo Boaler offer some concrete research on this topic in this article. 

For additional research on Hard Fun, check out Nicole Lazzaro's  model Four Keys to Fun.  


In the workflow of CREATING  Code You Can Touch outlined below, students spend some time EXPLORING some FUN tools.  We start with a LOW FLOOR tool (like Scratch) which can quickly have students feeling CONFIDENT.  As students are MOTIVATED to  PRACTICE further we provide CHALLENGES which leads to OBSTACLES that can be overcome.  As MOTIVATION increases to further EXPLORE leads to new ORIGINAL DESIGNS leading to CREATIVE CONFIDENCE with CODE.   If this sounds a bit like game theory - it is!  The best games are HARD FUN.

Walking away with a Physical Artifact that you CODED is like giving birth to something that you will treasure and that object becomes a physical reminder of the GROWTH MINDSET and sense of MAKER EMPOWERMENT you gain during the process. 

Start by INSPIRING  students with some amazing examples from @CeMoCreates and @morrill_rob


Or why not create a few of your own examples to provide students some artifacts they can actually touch!

Although there are lots of great examples of ART created by CODE,  I would suggest starting with some unplugged activities to introduce your students to algorithms while moving and turning around a room using angles and degrees as units. 


To start CREATING CONFIDENCE with basic algorithms consider using SCRATCH by MIT and the PEN Extension


Consider printing out Challenge Cards like this for your students to explore.


Having students share and compare their code is a great way to look for patterns and understanding that there are more than one way to create similar designs.


Once your students feel confident with the PEN tool, 
let's start to develop an understanding ANGLES and  DEGREES 

Depending on the age of your students, you might use resources like this introduction  from MATH IS FUN  or this Khan Academy Lesson along with some unplugged activities where students move around the room or create dances using degrees and angles to describe movement. 

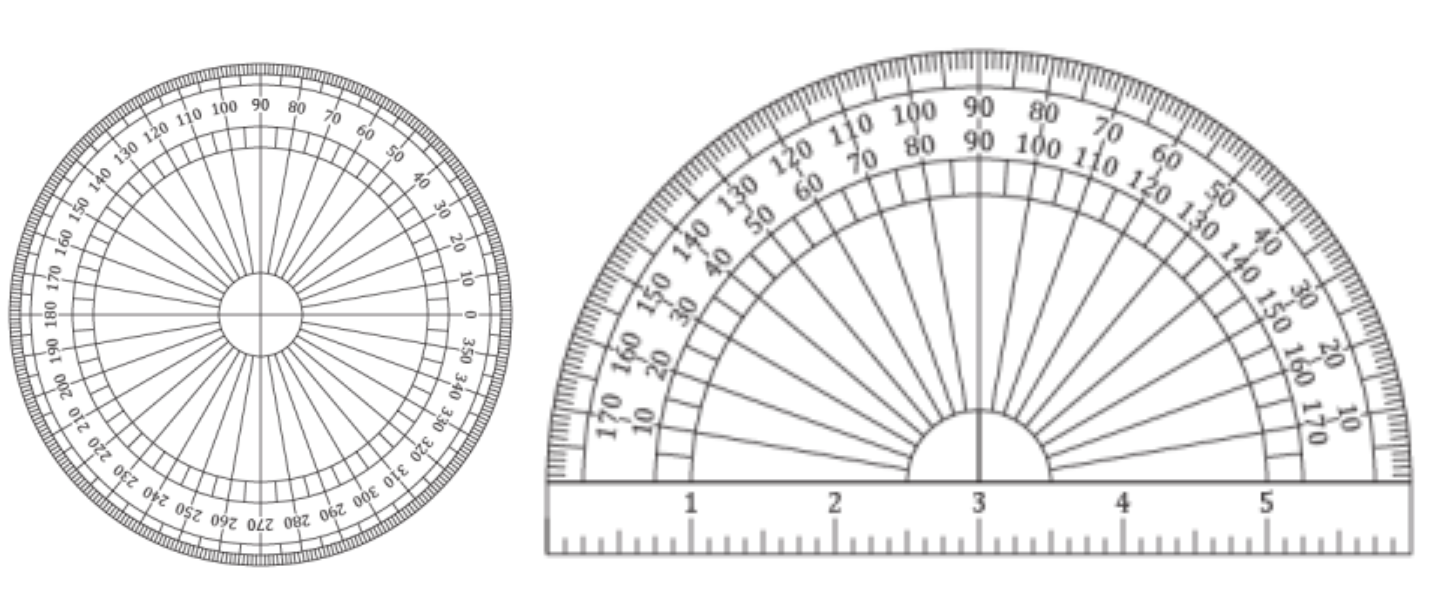
You might want to pass out some of these Printable Protractors(pdf)

Now its time for the students to explore using two different types of commands when creating their algorithms in SCRATCH 

Let's start by pointing the cat in a certain direction. 


Pointing your Sprite in a direction has very predictable results.

Once you feel confident with predicting what direction your sprite will move next using the POINT in DIRECTION block, it's time to start playing with the TURN DEGREES block.


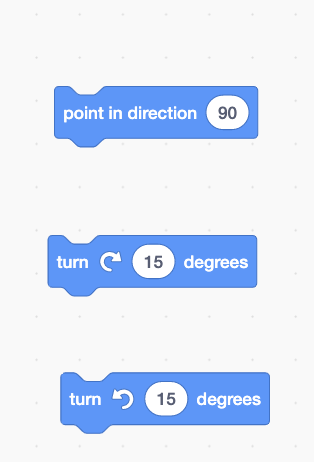
Point in Direction Block

The blocks points the sprite in a specified direction and moves within 360 degree angle.

Example; pointing the cars  towards their destination.

Turn Degrees Block

These block turn the sprite in specified amount of degrees , it can be either clock wise or counter-clock wise. It can change the direction where the sprite is facing towards.

  • Experiment with these two commands until you truly understand these.
  • Try different numbers. 
  • Use the protractors to predict what will happen.

This is a great time to introduce the GREEN FLAG event command and the ERASE ALL command.
Here are a couple of challenge cards you can use with your students.


Did you know that you can change the background in SCRATCH.
Try adding the X,Y coordinate grid background


Here's a new challenge card that for your students once they understand the coordinate grid.


By this time, your students should be prime to learn how to use LOOPS in their algorithms
I like to wait to introduce LOOPS until you actually NEED them to solve the problem of 'having too many tedious repetitious commands that seem to form a pattern".  This develops the computational thinking skills of pattern recognition.


Here's a great video to introduce the concept of using REPEAT (LOOPS) when drawing POLYGONS
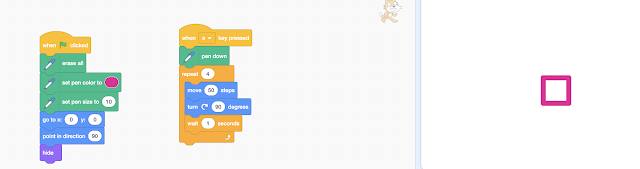


Explore! How many degrees would you need to turn to create 

3 sided polygon?
8 sided polygon?
A circle?


Here are two more challenge cards you can try with your new skills.


Your new confidence with drawing polygons is about to get SO FUN!
How might we create some cool designs by arranging several polygons near each other?

Let's add a NEW Event "When M Key Pressed" that slightly moves the cat and gets it ready to draw another polygon from a slightly different perspective.

Then lets' use the EVENT "When S key pressed" to draw a Polygon.

Keep doing that over and over again and (count) the number of REPEATS you need.
How might adding a WAIT command help you understand what is happening?
Where would you want the drawing to pause to allow you to see EACH segment being drawn?

Notice that the commands that only happen ONCE at the beginning of the program are still under the green flag event. 

NOW for the Final Performance.
Can we MERGE all the pieces of code so that we
 NEST the two commands into ONE ADDITIONAL BIG REPEAT LOOP.
We'll use the number of REPEATS you kept track of manually.


See if you can explain what's happening in the code above. 

Now see if you can create your own original designs
using different polygons and different values for the TURNS.
Here is a challenge card you can use. 


I like to create STUDIOS in SCRATCH to collect student designs. 

Once you have a gallery of original designs that you coded to pick from,
 it's time to create your physical artifact.  

You'll need to save your SCRATCH design.
I would suggest making sure the pen color is BLACK and the background is WHITE.
This provides a contrast that will lead to the best outcome.
You'll need to delete or hide the BACKGROUND if you used the XY Grid.

To save your design, RIGHT CLICK on your design and SAVE. 


Once you have the DESIGN saved as a PNG on your computer
you can IMPORT it into an SVG FILE CONVERTER like www.picsvg.com


You'll get different results depending on the filters you use.
You might not get the EXACT replica of your design, but I know it will be a fun and beautiful design that you will feel proud to have coded. 


Your final step is to Download your SVG file and
Import it into your favorite MAKER Tools to MAKE SOMETHING MEANINGFUL to YOU! 


Will you add your design to a T-shirt with IRON ON Vinyl?
or LASER CUT some earrings?
or 3D print a keychain?

The possibilities are endless and I can't wait to see what you CREATE. 
I'd love it if you would share your designs to this Scratch Studio
or share picture of the physical artifacts you made to this PADLET.


Friday, November 27, 2020

From GRAVIT to Lasercut Design for the GlowForge - Getting Started

 The following is the third in a series of posts that I started to increase possibilities for students and teachers using makerspaces in their schools.   The first few blog posts in this series included

1) From Google Drawing to Lasercut Designs for the Glowforge - Getting Started
2) From Google Drawing to Lasercut Design for the Glowforge - Next Steps

3) Creating Laser Cut Designs using Gravit for the Glow Forge -- a Cloud based Vector App -

Getting Started with Gravit using Primitive Shapes
Getting Started - Finding Joy Project
Getting Started with Gravit Importing SVG graphics

4) Creating Laser Cut Designs using Gravit Next Steps -- Working with Text

And for a wonderful set of short intro video tutorials to Gravit, check out John Umekubo's series here starting with his BASICS tutorial below

5) Creating Laser Cut Designs using Inkscape - Getting Started

6) Creating Laser Cut Designs using Inkscape - Next Steps

Inkscape Tutorial for Laser Cutter from Washco Utah Library Makerspace

While is is possible to use Google Drawing to create ornaments or badges like these,  it does require some hacks or work-around to get an SVG file that your laser cutter can cut. 

The ideal way to approach this tasks is to use software that was designed to created vector graphics and that  can export your creation as an SVG file.    Two of the most popular software tools for designing for laser cutters are Adobe Illustrator and Corel Draw.  If you have access to these, you will find lots of tutorials online that can help you use these tools in your maker-space. 
A free alternative to Adobe and Corel's tools for creating vector graphics is the open source program, Inkscape.   The beginning of this Inkscape tutorial does a great job helping you understand vector graphics as well as introduce you to Inkscape. 

However, none of these tools work on a Chromebook. After much research, I have concluded that the best tools for students using Chromebooks to design their own vector files  for laser cutters  (or vinyl cutters) is GRAVIT.  Gravit is a COREL product and  has a FREE and Pro Version.  The Free version is accessible to students on Chromebooks.   Students can even easily sign in with their Google Accounts. Because it is cloud-based, it  also has the benefit of allowing a student to start a project at school and easily finish it anywhere - anytime.   

Note: Your school should  get parental permission to be COPPA compliant when using Gravit with students.  As of this writing,  I have not been able to find a signed student data privacy agreement for Gravit. You can find updated privacy information for this product here.

The first part of  this tutorial will introduce you to some basic features of Gravit that you need to create aa simple badge, ornament, or sun-catcher. 

Start by creating a free account at https://designer.gravit.io/.   I sign in with my Google  account.

This 30 minute tutorial -- Creating a simple ornament or badge will provide an easy project based introduction to Gravit where each of your students can cut a personalized name badge using simple shapes. 


Coming next in this series - Ornament Part 2 - Adding more personalized graphics and fonts to our ornament.

For a great resource on using Gravit with kids, check out John UmeKubo's Gravit tutorials.


Saturday, December 28, 2019

From Google Drawing to Glowforge laser cutter Part 2


Earlier this week,  I shared my workflow for using  Google Draw to design ornaments, badges, or suncatchers to cut on our GlowForge Laser Cutter. 

You can read more about my search to find workflows that increase access to maker tools for students who use Chromebooks in last week's post where I talk about WHY Glowforge and WHY Google Drawing.


My first tutorial used primitive shapes from Google Drawings and Stencil fonts to keep things as simple as possible. But what if you want to use a font that is not a Stencil font or expand your choice of images?   Here is a cardboard prototype of an ornament for my grand-daughter, Rosie, along with a poplar wood version.


Today's tutorial is the second in the following series, where I'd like to share my next steps in learning how to design in tools that work on Chromebooks for  the GlowForge.

1) From Google Drawing to Lasercut Designs for the Glowforge - Getting Started
2) From Google Drawing to Lasercut Design for the Glowforge - Next Steps

3) Creating Laser Cut Designs using Gravit for the Glow Forge -- a Cloud based Vector App -

Getting Started with Gravit using Primitive Shapes
Getting Started - Finding Joy Project
Getting Started with Gravit Importing SVG graphics

4) Creating Laser Cut Designs using Gravit Next Steps -- Working with Text

And for a wonderful set of short intro video tutorials to Gravit, check out John Umekubo's series here starting with his BASICS tutorial below

5) Creating Laser Cut Designs using Inkscape - Getting Started

6) Creating Laser Cut Designs using Inkscape - Next Steps

Inkscape Tutorial for Laser Cutter from Washco Utah Library Makerspace


From Google Drawing to  Lasercut Design for the Glowforge -  Next Steps


For this project, I wanted to find a simple silhouette that would lend itself to be 'cut' out of wood.   There are several places to find great icons, including Flat Icon and IconFinder.  My favorite place to look for icon's that might work well is THE NOUN PROJECT.   It has over a million icons. These are free to use with attribution.  


I love this site so much that I subscribe to the Noun PRO version for  less than $20 per year.  This allows me to use any icon on the site without attribution and also adds features such as SVG download  and a few other apps  for easy integration with tools such as Google Slides, Adobe products, etc.


The trick is to look for a shape that will work well for your project.  The shape below could work well if you are trying to cut out a rose out of a round circular disk. But if you wanted to insert it inside a hollow circle, you would have to make sure that each part overlaps with the circular rim, so that the piece doesn't just fall out. 


After some consideration about my design, I selected the following icon from the Noun Project. 


I downloaded the PNG version to upload to Google Drawing.  The ability to download the SVG version comes with my subscription to NOUN Pro. This will come in handy in future tutorials, but when working with Google Draw, the PNG download works well.   You can use the handles to resize your icon, or you can type in a width and height that will work well for your project in the format options. 


I decided to use two roses in my design.  With a little resizing and nudging, I was able to create a design where the icon would overlap with the circle and rectangle shapes of the  ornament, leaving only the negative space to fall out. 

NOTE:  If you would like to import SVG images into Google Drawing, you  can do so but will have to convert them to *EMF files using a tool like Cloud Convert.   


From the first tutorial, you might remember how important it was to have contrasting colors, and to make sure that the borders of all parts are set to zero.  This will make it easier for the SVG converter to convert the file.  Check out my first tutorial   for a refresher on how to use the PICSVG site to convert your PNG design to an SVG file that will work within GlowForge. 


Experiment with the best conversion setting when using PICSVG.com 
Note that the first setting I tried left double lines when imported into GlowForge.
My second attempt to convert the SVG file created a nice clean line that cut as expected with my Glowforge laser cutter.  I used GREAT for Details and FILTER Ready#3. 


Next, I uploaded the ORNAMENT template (SVG file)  into  the GlowForge  software and selected the correct settings to cut  the material.  I usually cut my first prototype in cardboard.  Please see last week's tutorial  for important safety information about cutting cardboard on your Glowforge.  


The next step will be to find a font that works well with your design.  The trick with fonts other than Stencil fonts is that the inside of your letters are likely to fall out if you are looking to cut out your words on a laser cutter.  Luckily Tiffany Tseng has created a fantastic tool called Stencilfy that can help with this problem.   (note new location for Stencily here: http://stencilfy.herokuapp.com/ )


To use Stencilfy,  I  first searched https://fonts.google.com/ for a font that worked with my design.  I decided that the Pacifico font would look nice. 

I selected my desired font, and then clicked on the RED down arrow to download and unzip the *.TTF font file. 


Once you have the font file downloaded, navigate to Stencilfy site
  (note new location for Stencily here: http://stencilfy.herokuapp.com/ )
and upload that font file using the Choose a file option.  Type in the Text you would like cut out of your design. 


Notice that Stencilfy sliced the text in just the right places so that the the center of your letters would not fall out when cut.  You'll also notice that there are cut lines in places where the letters overlap.  This will work just fine in my design since the letters will be cut out.   EXPORT the text as an SVG file.
  (note new location for Stencily here: http://stencilfy.herokuapp.com/ )


Proceed to your Glowforge software to upload the Stencilfied text SVG file.

Select the right settings to cut your text out using the material you are working with.  Resize and align your font so it fits inside your design.   Leave ample room around your text so that your design is not too delicate.  It's easy to accidentally break your piece while peeling off the masking if the design is too fragile (she says from experience).  I would cut the text first, then cut the ornament by dragging the cut files in the order they would like them cut.


and Voila!  A cardboard prototype followed by a design cut out of Proofgrade Poplar.


If you prefer to engrave your text, you can skip the Stencilfy steps.  With the Glowforge it's quite easy to flip your material over and engrave both sides of your ornament or badge. 


In my next  tutorial in this series, I'll share my early journey into Gravit.io - a cloud based tool that allows you to create vector designs on a Chromebook.  This tool will add even more options for your designs.  Here is a sneak preview of what we will be able to do with Gravit.io


Monday, December 23, 2019

From Google Drawing to Lasercut Designs for the Glowforge


While I was a teacher and a technology and equity specialist in Vermont schools,  I always insisted on using the same tools my students had access to.  During that time,  I stayed away from a MacBook, because my students were using Windows based computers. At one point, I turned my laptop  into a dual boot (Windows/Linux) platform so I could improve my fluency with Linux and open source software. Open source software helped us  make more computers available to students.   In today's schools, Chromebooks have replaced Linux and open source software as the tool that makes it  possible to create 1:1 student:computer environments.   


The increase in access is great news, but provides some challenges as Chromebooks limit the tools students have access to. Not only do the tools have to be cloud-based, they also have to be free (or close to free) and have to meet student data privacy standards of the district.  Unfortunately, this is a presents a barrier for schools who are introducing laser cutters in their school's makerspace.

I've spent quite a bit of time recently looking for workflows that might help students and teachers work within those constraints.   (I've also spent quite a bit of time thinking how we might make changes that would reduce the number of constraints -- but that's for another blog post).  


The following is the first in a series of posts that I'm planning which increase possibilities for students and teachers using makerspaces in their schools.   The first few  blog posts in this series will include:


And for a wonderful set of short intro video tutorials to Gravit, check out John Umekubo's series here starting with his BASICS tutorial below

5) Creating Laser Cut Designs using Inkscape - Getting Started
6) Creating Laser Cut Designs using Inkscape - Next Steps

Inkscape Tutorial for Laser Cutter from Washco Utah Library Makerspace


From Google Drawing to  Laser cut Designs for the Glowforge - Getting Started


Why Glowforge? 


I've had my Glowforge Lasercutter for over a year now. It was one of the first consumer grade laser cutter to enter the market. This made it accessible to schools in both 'price' and 'ease of use".   I purchased the basic model at about $2000 during it's kickstarter phase. After using it for a year and watching other schools adopt the Glowforge, I can say that it definitely has a place in our schools.  I don't feel it eliminates the needs for some of the the higher costs lasercutters to meet certain needs in our educational landscape.   (more about that in a future blog post) 


The Glowforge has shortened the learning curve necessary to be able create using a laser cutter. The satisfaction and excitement of seeing your first product cut out of the laser cutter increases engagement and increases your motivation to learn more!  Once a student's motivation is at play, perseverance and grit kicks in and the learning process reaches places beyond expectation.  Some of the features of the Glowforge (especially its dual cameras has made it possible to get from point A (idea) to point B (product) much more quickly.   With other laser cutters, there is a lot more front loading that needs to happen.  Sometimes those skills are the goals (i.e. preparing for careers, and learning advanced design skills), but other times, the the amount of time and skills needed detract from your goals.  The Glowforge is the right tool for so many learning goals.  It is an accessible tool for younger learners.  It is an accessible tool for those just getting started.  It's an accessible tool for educators who don't have a background in design and tech.  And it's accessible  for those with a smaller budget. 


Why Google Drawing? 


Honestly, the right tools for the job when it comes to designing for a laser cutter include vector programs like Adobe Illustrator and Corel Draw. However, these program require quite a few hours to master and are not accessible to many students due to the cost or to the fact that most schools use Chromebooks as student devices.  There are few choices for creating with vectors that work with Chromebooks.  Gravit.io is one of the few tool that works on Chromebooks for creating vector designs; it also has a free and Pro version.  However, it is not available in all schools.  

One tool that many students have access to is Google Drawing.  Many students have some degree of familiarity with Google Drawing already since it is part of the Google Apps environment that comes with their Chromebook.  Therefore Google Drawing it is an accessible tool in both price, platform, and ease of use.  

So let's give this a try. Here's what we are going to make.  In my case it's an ornament for my grandson, Cedar.  But this project could be used for creating suncatchers or badges.  This project was designed as a skill-builder that will lay the foundation for future laser cut projects. It also allows for personalization - which is a great motivator in any learning experience. 

That being said, Google Drawing is not the perfect tools for the job, and it does require some work arounds.  So in this tutorial I'm going to share what I learned when I challenged myself to create a laser cut design for my GlowForge using Google Drawing. 

We'll use primitive shapes available in Google Drawing and manipulate color in a way that will make it easier for an SVG picture converter to successfully create a file that can be cut on a laser cutter.  We  will also use the WordArt feature of Google Drawing and a Stencil font to cutout text in a laser safe way - so the centers of letters do not fall out. 

Caveats! 

  • I'm not a design teacher and this worfkflow may not work with other laser cutters. 
  • This was not meant to suggest Google Drawing as the ideal tool for the job, but simply an accessible tool.
  • Lasercutting cardboard requires care and supervision as to prevent fires. You can complete this lesson by skipping the cardboard prototype and moving directly to cutting wood or acrylic. 
  • Glowforge does not have a cardboard cutting setting, but with a little digging you can find them online.

For this first tutorial, I will strongly suggest that you stay within the constraints of using fonts and shapes found within Google Drawing.  In the next tutorial, we'll learn how to find and use other shapes and fonts. It was my goal to help you build confidence with some basic entry level skills and end up with a fun project that you could be proud of.

So let's get started. 


The following is a lesson I recorded for those of you who would prefer a step by step walkthrough followed some highlights of the workflow. 


Workflow highlights


Use primitive shapes to create your design. (Do NOT import images. Yet!) 
Feel free to also use symbols!  We'll play with in Tutorial 2.


Feature Request to Google:  Please add the ability to merge shapes.


Use Word Art to add text! 
Change the font, but for this tutorial- Limit your text to STENCIL fonts so the 'holes' in your letters don't fall out when cut. 
We'll learn how to work around that in the next tutorial.


Use color to create a design that has two contrasting colors (silhouette look)
Make the borders or all shapes and Word Art TRANSPARENT. 


Download your Google Drawing as a PNG. 
(Note: even though it looks like you can download in the SVG format, this will most likely NOT work for many designs such as this one because of overlapping cut lines and the inability to perform a true merge of shapes. I explain this more in the video tutorial)


Using a site like  Picsvg  to convert your PNG to an SVG

Import your PNG file into PicSVG and play around with different settings until you find a setting that will create a clean look that will import into your GlowForge.  Export the file as an SVG.  I demonstrate some settings that will and won't work well with explanations of why they won't work at this in the video tutorial.


Upload the SVG file into your Glowforge software. 
Play with size and placement of your design. 
Add the right CUT  settings for your material. 


I use cardboard to prototype with then cut the final project in Glowforge's 1/8 inch poplar.
Take necessary caution when using cardboard.


And voila!
You know have a fun artifact that is evidence that you have the gained the foundational skills necessary to create a basic design in Google Drawing that can be cut on a Glowforge laser cutter. 


In the next tutorial,  I'll show you how to personalize your project with images and fonts outside those available in Google Drawing!  Here's a sneak preview of my second ornament personalized for my grand daughter.  


Ready for Part 2?  Here you go!