Tuesday, December 7, 2021

Intro to e-textile project for the holidays

Whatever holiday you are gearing up to celebrate this December,  I bet it includes LIGHT in some way.  So why not jazz up your outfit or presents with a light up e-textile project.  


A light up bow is a simple project that can introduce you to the basics of e-textiles.   Give it a try, and soon you'll start imagining all types of ways that conductive thread and sewable LEDs.    


What is e-textile?  

They are basically any project that integrates electronics and fabrics.  They often involve creating circuits with conductive thread and sewable lights.  More complex e-textiles might involve sensors or tiny sewable. microprocessors.   The Santa hat above is a more complex project that several lights and a micro-processor that plays music when you tilt the pom pom a certain way.  

Meanwhile the light up bow is the perfect starter project to build foundational skills necessary for more complex projects. 


To get started - gather up some traditional sewing supplies

Of course you'll need some fabric to make your bow from.  I found that felt works well for starter projects.  I chose red for the bow and black for the ribbon.  I happened to have a  red piece of 100% wool felt, which made the bow a little more elegant than craft felt. 

When selecting a needle, you'll want to select a needle that is not too large to make it through the tiny holes of some sewable battery holders.  (Size 5 or 7 work well)  Test your needle ahead of time.    Self threading needles can be very convenient.  Otherwise a few needle threaders will work just fine.  Have more than one on hand, because they break very easily-- especially with thicker conductive thread. 


To make sewable circuits, you'll need to source a few unique materials.  

There are several places to get etextile supplies, but my favorite place is THE IMAGINATION TOOLBOX - a small independent teacher owned online store who creates custom orders for classrooms or group functions like this classroom e-textile kit.   She has lots of great supplies for creative making that are not on her website (including the Sparkfun and Adafruit products) You can email her at caty@theimaginationtoolbox.com  and tell her what your goal is and she'll put together something just right for your needs. 


Here are a few tips to help you source the right materials and supplies.

Coin cell batteries such as CR2032 work well for beginner projects.   It is possible to pick these up at your local drugstore or hardware store, but they will be a lot more expensive.  With some advanced planning you can order these for less than 50 cents each. 

Sewable battery holders can be very helpful when creating e-textile projects. There are some DIY tutorials online for creating your own battery holders - but I advise starting with a sewable battery holder.  Using sewable battery holders will give beginners more creative confidence than trying to make your own battery holder in beginner projects.  Once you have the basics of e-textiles down, you might explore some of the DIY tutorials for making your own battery holders. 


This white plastic sewable battery holder is quite common. One disadvantage it has is that it does not have an on/off switch.  Another disadvantage is that the sewable holes are quite tiny and require a smaller needle. 

Battery holders like the ones below manufactured by Sparkfun and Lectrify have bigger sewable holes and an off/on switch. 


The secret to e-textile is to use conductive thread to connect your battery to your lights.    This thread is usually made of stainless steel.   As your projects get more complex you will find yourself seeking out many other conductive materials ranging from conductive yarn, conductive tape, to conductive velcro.  
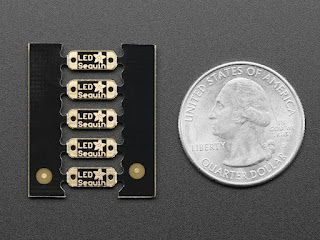
Beginner e-textile projects usually use small LED's that light up in a variety of colors.  Small sewable LED sequins like these are easy to sew and have built in resistors.  The resistors prevent them from being easily burnt out from too much battery party - they also allow you to mix and match colors more easily.  (More on that later). 


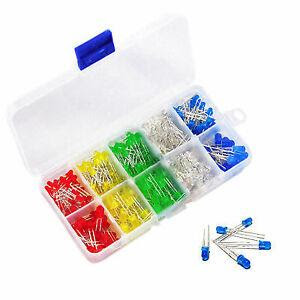
Traditional 3mm and 5mm LED's can also be made sewable simply by shaping the legs with a pair of needle nose pliers.  Tip:  Shape both legs into different shapes to make it easier to remember which leg is positive (long leg)  and which leg is negative (shorter leg)


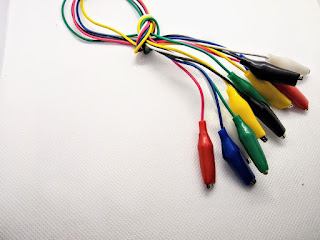
Alligator clips  also come in handy when prototyping projects and testing led's. 


Many beginner projects also include metal sewable snaps. 
These snaps can be used to create on off switches as well as fastening. 


How do I get started creating my first etextile project? 

There are some great tutorials out there to get you started with the basics.
I suggest reading through this great tutorial on the Exploratorium Website

The key to e-textile projects is to pick a simple beginner project to learn the basics.  Once  you understand how to work with conductive thread, where to position your batteries and lights,  and how you create a sewable on/off switch, you will have the creative confidence you need to design more advanced projects. 

This festive bowtie is the perfect beginner project.  It teaches all the basic skills and can be completed in about 30 minutes. 


Cut a piece of fabric or felt in a rectangle for the bow, and a contrasting piece of felt for the light up band to wrap around your bow. 


Use a glue gun or some traditional thread to shape your bow. 


Play around with the position of your battery, lights,  and snap on your wrap-around band.


Use conductive thread to attach these to your wrap around band in a way that creates a complete circuit. 

(video tutorial coming) 


Voila 
Use your new light up bow to dress up a holiday garment or present. 


Wednesday, November 24, 2021

Arizona inspired Microbit eTextile project

As the Christmas holiday approaches while our bus is parked in Tucson,  I found myself inspired to create an Arizona inspired e-textile project that can function as this year's Christmas hat. 


I still remember the colleagueship that  Jill Dawson, Leah Joly and I felt back in 2014 when we encouraged each other through the process of learning how to create with code via e-textiles   Leah made an Ugly Christmas Story, Jill  created  a Rudolph Hat with a temperature sensor, and I created a singing Santa Hat with a tilt sensor in the pom-pom. 


And while I still have plenty of LilyPad supplies, I decided to see where the Microbit might take me in playing with eTextile.  This felt like a great opportunity to learn how to increase my confidence with Microbit controlled neopixels.

I started with a straw hat that I had purchased to walk around the desert with; the  decorative holes were begging for sewable LED's.


I started thinking that I would place 7 color changing NEO Pixel lights on the hat.

I broke off 7 neo-pixels from a sheet of Adafruit neopixels that  I've been carrying around for a few years.


and considered where I might want to sew them on my hat. 


I also experimented with where I might want to place my micro-bit and battery pack
 so it would be comfortable and secure. 


Out came the alligator clips so I could attach the neopixels to the  the microbit 
and play with controlling them with block code (via MakeCode).  This was actually the first time I have used neopixels in a project.  I always felt intrigued but  intimidated by them.  
Thanks to the  Adafruit Uberguide to Neopixels, I started to understand them better.


I felt comfortable sewing conductive thread to the Ground and Power pads in extexile
but adding a third conductive trace through the DATA IN and the DATA OUT pads was new to me. 
It still baffles me how so much data can pass through a single piece of conductive thread through a series of neo-pixel lights. 


After some frustrating and unpredictable results when I experimented with the wiring, the code and neopixels, I came to the conclusion that that alligator clips don't grab the neopixel pads reliably causing some erratic results.    It was also really hard to spot possible short circuits with so many wires in play. 

Eventually I  felt like I understood the circuit paths and started to use conductive thread 
to sew 7 neo pixels onto a piece of black ribbon. 


Unfortunately the final results didn't light up.  
No matter how hard I looked I couldn't spot the problem. 
Eventually I started to cut apart the black ribbon, but on a hunch, I  tested the 
circuits after each cut.


My hunch paid off, and after sacrificing two neo-pixels, the 5 remaining neo-pixels lit. 
I reworked my design to one with the 5 working neo-pixel strip and moved on. 


The next challenge was thinking how I might attach the three strands of thread to the microbit without shorting out the circuit from loose conductive thread moving around under my hat.  I almost reached for some thin  insulated wire and some small screws. 

But I convinced myself to try to come up with a plan that used the supplies in my sewing basket.
The plan I came up with was to use conductive thread to sew a piece of fabric onto the microbit -  then add snaps to the fabric that were connected to the microbit via conductive thread. 
This would make the microbit removable to be used in other projects if needed. 
It also kept things soft and flexible.
Of course I tested to snaps in my basket to make sure they were conductive before sewing them on. 


I hit another obstacle when I came to attach the threads from the black ribbon to the snaps.
The data pad on the neopixel was in between the PLUS and MINUS on the neo pixel.
Meanwhile the microbit had the plus and minus connectors both to the right of  the Pin 0,1, 2 options.
I could not see anyway to not cross the conductive thread without insulating them.


I finally decided to make cloth channels for each piece of thread.  This insulated  the thread while keeping everything soft and flexible.   It was not pretty, but it worked.  I also chose fabric scraps that created a way to color code the (now hidden) wire to match Ground (black fabric scrap), Power (red fabric scrap) and NEOPIXEL data (multi-colored fabric scrap)


I'm almost embarrassed to post this one picture, but I  reminded myself that this was really a proof of concept prototype level project, and it was okay to forgo beautiful for functionality and focusing on my aspiration to learning to code and control neopixels. 

I tacked the black ribbon with just a few stitches - and when I was convinced that that the circuit worked with no shorts, I applied a layer of nail polish to  any exposed thread as an insulating layer.  Crossing my fingers that this would prevent shorts from happening as I moved around wearing my hat.
I grabbed some good old white thread, a glue gun, and velcro and did a quick job securing  everything in place before heading over to play with code. 


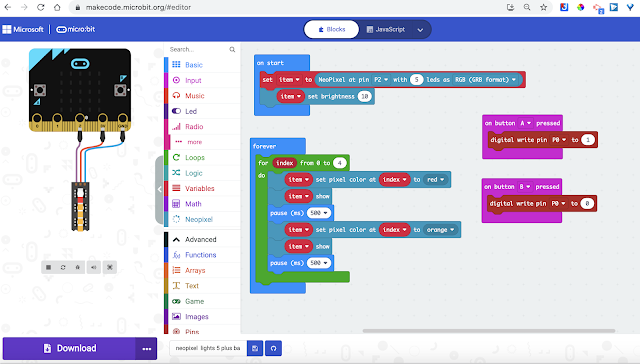
I added the NeoPixel extensions and the Make Code command and started with a simple animation of  a little red dot making its way through the 5 neopixels leaving them lit orange as the red dot moves through the loop. 

I was ready to continue playing with code, but the two empty pins on the microbit called for something. 
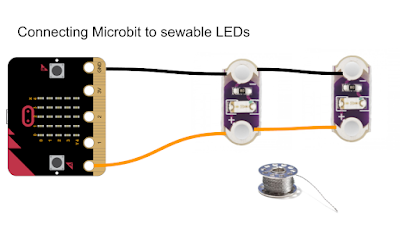
I decided that my prototype might make a good teaching tool if I added some more straightforward LED's to the design.  So I grabbed a black ribbon and some red and white holiday decorations and added a festive looking band to the hat.     I added two simple sewable LEDS  which I attached to PIN 0 on the microbit.   This would allow me demonstrate the code needed to control straightforward external LEDS as well as NeoPixel LED's


I made sure they worked by adding a couple simple code snippets that would turn the little LED sequins off and on with button A and B 


And voila a physical computing project that has me vested enough to experiment with 
Microbit code.  


But wait -- there is one more pin left open.
I can't let that go unused. 

Considering that I also aspire to gain more creative confidence with sensors --
I think that this seems like the perfect use for that open PIN. 

I've received some interesting suggestions from my online network. 
More experimenting ahead -- 

but first a little pedagogical introspection~

I truly believe that physical computing is integral to engaging and motivating a more inclusive culture in creating, making, and computational thinking.    

One only has to look towards the work of Seymour Papert to see the value of physical computing towards giving students powerful thinking tools. 


According to Papert, “The role of the teacher is to create the conditions for invention rather than provide ready-made knowledge.” (1993). By giving our students the opportunity to learn math through coding, and a chance to design their own algorithms to solve problems, we are providing them with “tools to think with over a lifetime.” (Papert, 1980)


The hours I spent giving birth to this object has me vested to persevere through some of the challenging thinking that comes with learning to control my object. 

Sure it might seem be a lot less time consuming to use a digital platform to teach algorithms, syntax  and computational thinking.   But who do we lose along the way? Who shows up?  

A quick look at the gender ratio in todays computer science courses shows that white males continue to show up.  Although we are seeing some increase in female participation, that ratio continues to be less than 20 percent in my state.  


I truly believe that  the use of  physical computing to create confidence and interest in computer science would result in a more diverse culture in computer science education and related workforce. 

But more importantly - building and controlling aa personally meaningful physical object will give students "tools to think with over a lifetime." (Papert, 1980) 


Monday, November 1, 2021

Halloween Inspired Making Part 2

 As you saw in our last post,  our Halloween station set up outside the bus in Desert Hot Springs, California included a DIY Jack O Lantern as greeter next to the candy bowl.  It was an opportunity to refresh or learn some foundational maker skills. 


Our last post highlighted the design of the pumpkin using  Gravit and the Noun Project. We used the Cricut Maker to cut out some vinyl and cardstock and ended up with a base for our project. 

My goal for part 2 was to spark a maker mindset with a little toy hacking.  A great way to do this is to look around your house for some discarded toys -  but since the bus is pretty minimalist living - I decided to stop in a few nearby dollar stores.  My goal was to find some inexpensive novelty gadget that had LEDs and made sound or vibrated or moved.  

My guess  from the slim pickings is that the current supply chain crisis was at play.  But I did manage to find aa LIGHTUP mouth guard and a few clip on Halloween gadgets to break into.  No sound ;-( No motion  ;-( - but some fun lighting sequences ;-)


So the next step was to crack them open and see what I had to play with. 


hmmm batteries,  some LED lights and a switch


hmmm could I break apart the LED's and extend them further away from the batteries and switch?


ah found a piece of network wire I could use

An opportunity to practice soldering!

I've never been good at soldering, but since my cataract surgery this summer, 
it became even more challenging
They inserted a new lens in my eyes where I can see far ... but 
I can no longer see better when I get close to something


I have an idea


and of course some cardboard


ooooh - I found another blingy thing to hack into at the drug store


Also found a Harbor Freight nearby and picked up a few things including
 some more Alligator Clips for prototyping and 
a Third Hand with a built in LED lighting and magnifying glass 
that helped with soldering


The third hand really helped with soldering 
but I need a LOT more practice 


Eventually I was able to solder a few wires to a small circuit board
that seemed to have a momentary switch on it that 
ran some blinking light patterns for about 20 seconds or so

this allowed us to make really blingy eyes
for our Jack o Lantern
that could  be activated with a paper clip switch 


Not a bad toy hack considering the constraints I was working with. 

But what if I wanted to keep the eyes blinking through the night? 

hmmm perhaps adding a Microbit with some code


The Microbit also  allowed us to add an animated mouth and some music 
I love any excuse to create with code 


and voila  -  

Meet Jack
our Halloween greeter


oh... and I also decided to put some fairy lights I had picked up to good use
for a quick costume change for myself 


while Craig added some colorful solar lights to the bus


Happy Halloween
and 
Happy Learning through Creating and Making