Wednesday, March 31, 2021

Steps for Performers as Remote Collaborators


This post  is part of a series on Making Video Projects with Remote Collaborators. 

We recent post we discussed 

Building Community and Engagement in the project
    Preparing Scripts and Materials
    Setting up a collection method for recordings and other assets

This post will shift the focus to the Remote Artists/ Singers/ Dancer/ or Performer


Step 1:  Learn Your Part 


Of course the first step is to  use any rehearsal slide decks or guide videos that your organizer or director provided you.   Whether you use a rehearsal slide deck such as the ones we shared for our Readers Theater Project or a virtual choir guide video such as the the ones found in the these virtual choir kits, or whether you create your own, make sure you set aside time to become comfortable with the material. 

Having a buddy system  between the remote artists can help everyone feel connected to the community and to the whole project.  It is important to also honor the preference of those who  prefer solitude when learning their part. 

Step 2:  Set Up Your Shot


If you are reading from printed material, you will only need ONE recording device.
Most smartphones have great microphones and decent video cameras.

 
If you are reading from online material, you'll want a playback device and a recording device.
I would use my laptop or a chromebook as the playback device and a phone as a recording device.


If you are recording, while listening to a guide video you'll need headphones set up to your playback device. 


If you have one handy, grab a tripod for your recording device to keep it steady as you record.
You can also create a DIY tripod from a cracker or cereal box.  

Position your phone in the landscape mode.
Think of the orientation of your TV and position your recording device so that it also captures this landscape orientation. 


Position the guide script you are reading from or watching at eye level as close to the recording device as possible so it looks like you are looking into the CAMERA, not glancing away.


Select where you will be recording. 

You'll want to avoid places where cats, pets, family members might be making unexpected appearances or background noise. You'd be surprise how loud dishes clanking in the background can sound, no matter how quiet your family members are.   

Don't forget to turn off fans, air conditioners, or noise machines.  Sometimes even a fluorescent light can create background noise. 

Beware of wind noises that come from recording outside.

Take a second to clean up the background from clutter or distracting items.
Keep your background simple, cheerful,  and inviting.


Play with the lighting

Avoid having a window or bright light BEHIND you.  This will make you look like a silhouette.


There are many tutorials online describing the function of each light in a 3 point lighting setup.  These can help you understand the impact of lighting, however you don't need a  fancy setup.  Just make sure your light source is NOT behind you making you look like a silhouette. 

If you are using a green screen, you also want to eliminate as many shadows as possible. 

Can you position yourself so you are facing a window or light source, placing the the camera between you with a light source or window behind the camera?  

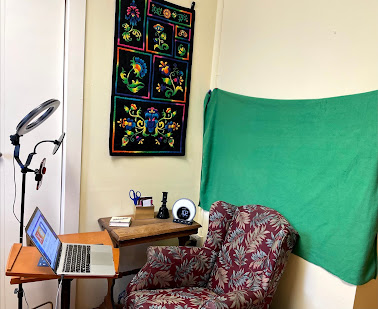
Here is the very mobile setup I have using an inexpensive ring light and a wrinkle free green fleece fabric that I can tack up when I want a green screen.  


You can also use a an outside window or a  household lamp with an LED bulb to shine light on your face from behind the camera.


Step 3:  Submit Your Recording


Avoid emailing or texting your recording.  This will compress the video and the reduce the quality of the sound or video.  

The instructions from your director or organizer should include include directions on how to submit your recording. 


Using a DropBox or Google Drive upload will result in much better workflow for those assembling the video.  This recent post outlines 3 different ways that your organizer might use to collect your recording. 


Have fun and enjoy the process.  In the next post, we'll discuss other ways you can contribute to the project with extra sounds or art.


Saturday, March 27, 2021

Roles for Remote Collaborators

As we proceed through the process of another video project with remote collaborators,  my thoughts have evolved around the possible roles for collaborators.   Since the focus is on collaboration,  it feels to me that having two collaborators lead the project makes sense.  What if we created a two person team to lead the project made up of an Organizer who focuses on logistics and a Director who focuses on creative vision.  Of course both tasks are closely intertwined, thus creating a more collaborative opportunity and  providing a thought partner for the leaders of this project.


In the Readers Theatre project that we are currently working on,  I welcomed having Kate to think through and talk through the process.  Her experience with Readers Theater made her a natural for the role of director, while my experience with technical logistics kept me in the role of project organizer.  Having a two person team kept the project collaborative filling the need that the project would address the social isolation we have all been feeling this year. 


In the Reader's Theatre piece there were obvious roles for actors.  Similarly in  a Virtual Choir piece there there are various roles for singers (i.e.alto, tenor, soprano, bass).

However, there are lots of other roles that can be included in your project.  
Here are a few we came up with for our Readers Theater project.  I must admit that I did a quick online search to learn what a Foley Artist was when it was suggested as a role. 


As you create, assign, and select roles consider  your goals/purpose and age and skills of your students/team. Consider how you might  include each member of your team in a way that plays to their interest and strength. Also consider how you might provide opportunity for team members to grow confidence and skill in new areas. Perhaps create a buddy system what allows someone with more experience to mentor another team member who wants to grow their skills. Be sure to consider time constraints including available synchronous vs asynchronous time as well as remote vs. in real time limitations.


Throughout the project, the organizer and director will take lead in the communication process between various collaborators.


In our project, we eventually decided to complete the project without additional illustrations, art, or animation. You might decide to expand the project to include original art, graphics, and animation.


Since there was a high interest in adding additional sound to the project, we facilitated collaboration between various sound engineers or Foley Artist collaborators.

Cynthia became the creator of original sounds and recorded a stream soundscape as well as original drumming. Emily worked with finding just the right music and sound effects to add to the script.


We entered into a great discussion on the need to checkin with an Abenaki colleague on the inclusion of the drumming sound effects. This conversation really opened my eyes to the power of this Readers Theater project to become aa tool in culturally relevant teaching or in increasing awareness of implicit bias.


Even the wording of the query lead to increased knowledge and skill for me:


"We used an Abenaki story, as told by Dr. Joseph Bruchac, as our script, with his permission.  We put a sound track in with the nature sounds and footsteps, and etc.  There is a fifteen second scene in which some crayfish are doing a victory dance.  In order to avoid having to get more permissions, I just recorded Steve doing a little Irish drumming.  Then it occurred to me that it might be considered inappropriate not to at least try to do an Abenaki rhythm.  But, it seems like it would definitely be rude to assume that he could learn to do an authentic one properly from YouTube.  When I thought, "Oh, dancing--we'll need a little drumming," was I succumbing a stereotype?  Would it be better to leave the drumming out?  I suppose we substitute a little banjo or mandolin--if crayfish can dance, they can probably play stringed instruments too!"


This really drives home the benefit of collaboration between students and between educators and made me so grateful for the amazing librarians in my PLN who joined this project.


In the next post, we'll share examples and templates for communicating with the actors/singers/artist as well as with other collaborators.


Friday, March 26, 2021

SPRING CUE 2021

 I'm so excited to be part of Spring Cue 2021 tonight.   My session Creating Virtual Video Projects with Remote Collaborators is framed around what we learned while making Video Projects with Remote Collaborators this year.  I'll share the top 10 things that will help anyone making media with remote collaborator.   

Here are the slides from tonight's session. 


Sunday, March 21, 2021

Making Media with Remote Collaborators Step 2

This post is part of a series outlining the workflow to "Making Media with Remote Collaborators" 
In this series we will use  the steps in this workflow to the creation of a Readers Theater project.


In this  post we cover  ORGANIZER STEP 2 and 3 :  


Prepare the rehearsal script & materials


During this step it is important that the organizer, director, and video producer collaborate on some key decisions. 


"What methods would work best for actors/singers to record their individual parts.,"

Here are two approaches we considered along with the pros and cons of each option.


In Option 1, 
the organizer creates a rehearsal slide deck along with a rehearsal video.  Actors use the rehearsal video when recording their lines. They remain quiet when its not their turn to record, and speak their lines at  the appropriate time during the recording.   This is sometimes called a click track.  Each actor starts by CLAPPING Loudly at the beginning of the video. This clap helps the video producers align the tracks.  This method requires more pre-production work time to create a guide video.  It is the best choice if singers are trying to sing in-sync.  It can also be used for other type of projects such as readers theater.  The pacing of the guide video might be hard to predict.  Readers might read faster or slower.  The video producer can make some manual adjustments to accommodate for slow readers during video production. 


Create a guide Guide Video like this example for a sample readers theater project. 

This method was modeled after the Virtual Choir Guide from Adam and Matt Podd.

Your final outcome might look like this SAMPLE project. 


In Option 2,  the organizer creates a rehearsal slide deck like his one.   Actors use this rehearsal slide deck to practice and record their lines.  They quickly manually advanced through the slides  that  do not contain their lines and only read their lines.  They  make sure to pause at least 3 seconds after each set of lines they record. 

The video producer will import each actors' video on one track, then use the pauses to split and trim the video into segments. Then they will drag each segment to a new video track to reorder the segments.  This will require more post production work, but the pacing will appear more precise.  In this method,  the actors will only be on 'stage' during their lines. 

Use this template to create a rehearsal Guide for Option 2.

Here is a sample rehearsal guide 

 No Guide Video is necessary for this option. 

Your outcome using this Option 2 might look like this sample project. 


Depending on your teams confidence with tech, it  might also be helpful to  publish the slide deck and COPY published link to share with your TEAM.  This will allow them to  OPEN the published LINK in one tab and to easily advanced the slides manually as needed in full screen view. 

This is also super helpful when you are using  the same computer to display the script and to record. 


Another consideration that the organizer, director, and video producer must consider is 

'What method will you use to collect recordings or media assets from collaborators."


It is also important to Collaborate  with your director and video producers to decide which method(s) will work best for your project.

Here are 3 options starting with the easiest method first.

                                            
  1. Setup a Drop Box- File Request to Collect Recordings

    1. The easiest method for  those submitting files. Also most secure.

    2. No need for a Drop Box Account; No need for Google Drive.  Everyone can do this. 

    3. Organizers needs a Drop Box account

    4. Can use FREE version of Drop Box (Up to 2 Gigs) 

  2. Set up a Google Drive to collect recordings

    1. Works well if your artists/ singers are already use to collaborating 

with Google Drive and all have Google accounts

  1. Works well for those who are already using Google Classroom

  2. Requires the Google Drive App 


  1. Record directly into WeVideo 

    1. Works well if your users already have WeVideo accounts.

    2. Works well if users will be invited to be PROJECT collaborators to the project inside WeVideo.  (See slide on how to SHARE your MEDIA to PROJECT MEDIA in WEVIDEO)

    3. WeVideo media clips can be downloaded to your hard drive and sent to organizers using method 1 and 2 above.


The method you chose will depend on several factors. 
If you and your actors are familiar with Google Drive, this may be the best options. 

If some of your actors don't have access to or are unfamiliar with Google Drive, Drop Box makes it soo easy.    You may need to upgrade to the paid version of Drop Box if the recordings will exceed the 2 Gig liitation of the free version. 

If your group has access to WeVideo EDU, you might choose to have them record directly in WeVideo.
You might 


Stay tuned for the next post where we'll share Step 4  in the organizer's process


Friday, March 12, 2021

Making Media with Remote Collaborators - Step 1

Each of us in the educational technology field who have been influenced by Dr. Ruben Puenteduraare constantly see technology through the S.A.M.R. lens.  We know that it's not the tool that determines whether a technology is transformative, but how it's used.   


This school year has certainly provided ample opportunity for technology to create tasks that were previously inconceivable.  Who would have predicted the many ways we have found to keep on creating, making, and learning together remotely throughout the past 12 months. 

After seeing my sons pull together hundreds of musicians from NYC last year to Keep on Singing 


I started to imagine ways we could make media projects with remote collaborators in our schools. 

Luckily I found others who were willing to play and we experimented with this virtual caroling project for our state conference, 


I could not have asked for better timing for 


This WeVideo feature brings the same level of collaboration to media making that Google brought to us with Google Docs.   This brought so many possibilities that were previously inconceivable -and I was itching to try some of these ideas out.  When I put a call out for ideas of how we might create examples and workflows of media making with remote learners, My PLN did not disappoint.  The ideas ranged from Virtual Choirs, Newscasts, Talk shows,  Reader's Theatre, Poetry Readings, Podcast,  to Cooking Shows.

So many great ideas for collaborative projects, but the enthusiasm from the Vermont School Library Association around Readers Theater made it seem like the perfect fit for practicing  and sharing the workflow for collaborative media making project. 

In the next few post for this blog, I'm going to share what we are learning along the way that might help you create a successful workflow for media making with remote collaborators. 


Yes, WeVideo will be in the mix,  but so will other tools and practices that make it possible for us to collaborate remotely, as well as, in the same space.   Please send along your examples or tips and tricks  in the comments, via email, or twitter @techsavvygirl and I'll add them in this series. 


Let's start with PRO TIP #1   
SUCCESSFUL Collaborative Projects 

  • ENGAGES all participations
  • CREATES opportunity for CONNECTIONS
  • BUILDS Community
  • MEETS Social Emotional Needs of us a Humans
  • EMPHASIZES process over product
  • INCLUDES the VOICE of  your collaborators
  • GENERATES Joy
  • STRENGTHEN Relationships

Our first step in organizing our Collaborative project did just that!
Several Vermont School Librarians showed up eager to share their ideas, knowledge, and skills.
I left filled with joy, excited about the project, and connected to community. 


Using everyone's input we decided on a script from Joseph Bruchac

Raccoon and the Crayfish

Stay tuned for the next post where we'll share Step 2 in our organizational process


Saturday, March 6, 2021

Making Media in a MakerSpace / Learning Space March 17

When we talk about  having access to spaces and tools for hands-on minds-on learning,  Making Media feels like a natural process to include.  Many of the makerspaces or innovative learning spaces we have visited over the years have a sound studio with a podcasting microphone or movie making studio with a green screen.  With tools like WeVideo for Schools,  that now support real-time  remote collaboration,  students can have anywhere anytime access to collaborative media making opportunities remotely, as well as in real time. 

We decided that Making Media was a timely topic for our March Monthly Maker Educator Exchange on March 17.


Sign up here to join either the morning or the afternoon group of educators who will meet to share  projects, challenges, tips, and tricks for Making Media as part of their innovative learning space.  

Our tentative agenda for March 17 will start with 10 minutes of networking and introductions.  We'll then invite all participants to share a project, tip, or trick that focuses on Making media.  In the last 30 minutes we'll invite you to join a hands on workshop that models how you might use WeVideo's real time collaboration tools to create collaborative video projects or podcasting projects. 

We'll send all registered participants the Zoom link for this virtual event. 

You may also signup up through our Monthly MakerEd MEETUP group here.

Let's learn together and inspire each other.  Speaking of inspiration, here's a fun maker project using Green Screen that Carly Marsh-Brassord  made at Create Make Learn 2015. 


And if you missed our earlier monthly meetups, you can find resources and highlights below

January resources and highlights 

February resources and highlights