Subscribe to this blog to get new learnings ideas, discoveries, and inspiration from the CREATE MAKE LEARN community, along with updates about our upcoming Summer Institute and Workshops.
Join the Strand that's right for you - from Newbie to more Advanced Learner
Getting Started with Creating and Making (for beginners)
Create Confidence with Creating, Making & Coding (for those with some previous experience)
Registration is now open.
~Creative and Practical Problem Solving with Cardboard, Paper, and Loose Parts
~Designing STEAM infused Literacy Projects
~Make Media: Podcast & Green Screen Video Projects
~Create Confidence with Circuits & Code
~Design Thinking & Identity Projects in 2D & 3D (using 3D printers, Laser Cutters, Vinyl Cutters, etc)
-Explore role of AI in Creating and Making
Options for Graduate or Recertification Credit
Complete and share a Meaningful Making Project applying your learning through design, creating, and making
Plan a curricular unit or school project where creating and making are central to learning goals and provide opportunities for students to develop growth or proficiency of Vermont Transferable Skills
Connect with peers that best meets your needs : PreK / Elementary /Middle School / High School
The first 10 people to sign up will receive a toolbox filled with supplies and tools you can use for creating and making in your classroom.
Get Inspired
Create Confidence with new Tools and Processes
Make Something Meaningful
Photos from 2023 Create Make Learn Summer Institute
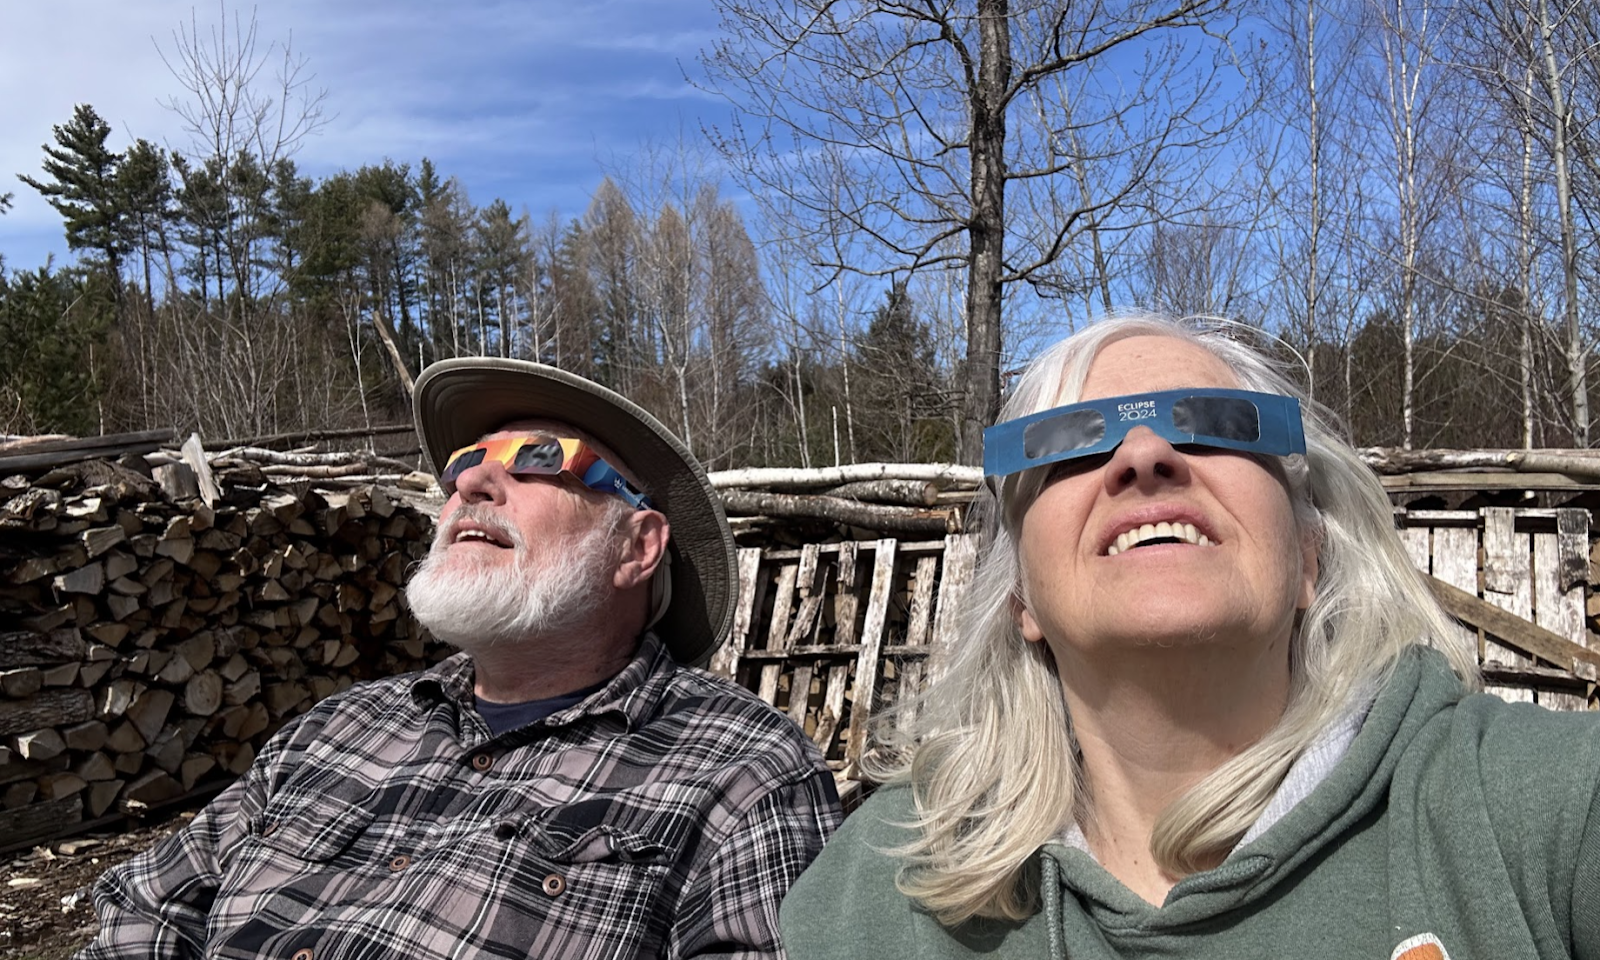
Not only did I get to experience Totality during our April 8 solar eclipse, I also experienced creating my first AI chatbot Scratch Project I was introduced to the Creaticode platform during a recent Scratch networking event and was immediately intrigued when I saw the AI code blocks.
Spending a few quiet days in northern Vermont just before the eclipse gave me the opportunity to play and explore the Creaticode tutorials. And in no time at all, I found myself creating a project with an AI chat-bot around the topic of the Solar Eclipse we were about to experience.
Note: I just learned that you have to be signed into CreatiCode for the ChatGPT connection to work.
Sign in as a students for easy access. This will also allow you to 'SEE INSIDE" and see the actual code.
How I approached creating my first AI chatbot project with CreatiCode.
If you are familiar with Scratch from MIT, you will find yourself right at home here. There is even a DOG sprite that sort of looks like a CAT on the opening screen of a new project. I immediately spotted the buttons I needed to add sprites and backgrounds.
I started my new project by picking a new background that was somewhat celestial in nature.
Then I added the closest thing I could find to an astronaut looking sprite named Ripley.
I started by making the Dog welcome us using the SAY Block which is found in the purple LOOK section. Remember to Click on the Green Flag to Run your program.
Now let's add some code to the Ripley sprite. Instead of coding in a static response in this dialogue, I started to explore the AI code blocks that allow you to access ChatGPT to make the character dynamic and interesting. Here are some initial instructions to get you started if you are following along.
Start by creating a variable to hold the RESPONSE from ChatGPT
Using the orange set of blocks (Variable) click on Make a Variable, and name your new variable ‘response’.
If you add a blue checkmark, the variable will show up on your stage. You can always uncheck the response variable later to hide it from your stage.
Now its time to add some AI blocks (dark purple).
Let's start by analyzing the OpenAI ChatGPT block and its parameters.
Select the purple OPENAI ChatGPT: request block. Replace the word HI with a PROMPT or REQUEST to ChatGPT.
The reply or result from ChatGPT needs to be stored in a variable. We'll use the response variable we created earlier to store the results from ChatGPT.
Keep the MODE on "Waiting" for our first example.
Mode: This dropdown controls whether this block will wait for all the response to come back before continuing to the next block.
If it is set to “waiting”, then the program will pause at this block, and when we get the full response from OpenAI, it will be stored in the result variable, and then the program will continue to the next piece of block code.
Here is my initial attempt at using the ChatGPT block to control our Ripley Astronaut Sprite
Let me walk you though the code.
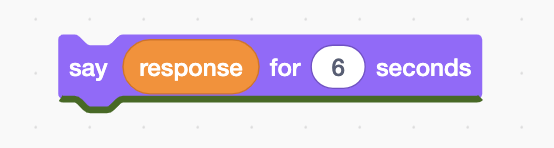
Since my Dog used '6 seconds' to say the Welcome statement, I added code for Ripley to
WAIT 6 seconds.
Now let's use the purple ChatGPT request block.
Replace the word HI with the blue prompt below. and add the response variable to the drop down orange box right after the word result. The response variable we created earlier will store the ChatGPT reply. Keep the mode "Waiting" and the length and temperature the same for now.
You are an astronaut getting ready to experience a solar eclipse. You've never seen one before. Tell us how it feels to be waiting for this event of a lifetime. Keep your response to 50 words.
The next block code is for the RIPLEY sprite to 'SAY' the ChatGPT's response for 6 seconds.
Click on the GREEN Flag to RUN your program. A different response from ChatGPT will be displayed each time you RUN the program by clicking the Green Flag.
At this point, I would remove the RESPONSE variable from the screen. To remove it, simply click on the Variable code block and remove the blue checkmark next to response.
Here is some useful info about the rest of the parameters in the Open ChatGPT session code from the Creaticode knowledge base.
Length: This is the maximum number of tokens for the response. You can think of a token as a word or a symbol. ChatGPT will try to make sure its response does not exceed this limit, but it may not be able to give a complete response if the limit is too small.
Temperature: This is a number between 0 and 2. A higher value will make the response more random and creative; a lower value will make the response deterministic and focused.
Session: This dropdown controls whether we are continuing the previous conversation, or we are starting a new chat. If it is a new chat, the ChatGPT robot will not remember anything from the previous conversation (the “context”).
For example, if we try to ask 2 questions that are related using “new chats”, ChatGPT does not know what we want it to do for the second question, because it does not “remember” the first question is about calculating squares:
Then I started to play with my prompt a bit by giving ChatGPT more info. Play around with your prompt by giving ChatGPT more info along with a role to play. Limit the number of words in the response it offers.
It was so cool to hit the Green Flag and see my Astronauts share his feelings about the Solar Eclipse.
Don't be afraid to experiment with your PROMPT and some of the parameters in your ChatGPT request block.
I ran into trouble when I first changed the parameter to STREAMING.
Note that the green checkmark appears as the last character of a ChatGPT response. So if you want the streaming affect you need to use the REPEAT UNTIL code block to loop until you get to the end of the reply. Use the link below to copy the green 'checkmark' that signifies the end of ChatGPT's response. https://emojiterra.com/white-heavy-check-mark/
By now I was hooked, but it was time to go experience TOTALITY.
Sometimes there are no words!
I spent a good part of the next day or so thinking about the universe! So many questions came to mind. And I immediately got an idea for where I wanted to go next with my ChatBot project!
What if I could create a storyline with a chatbot astronaut that allowed students to enter the many eclipse related questions that were sparked from their solar eclipse experience. I felt like my brief exploration of CreatiCode provided me with just enough skill to bring this idea to life. It's not perfect, but here is a tour of my coding journey.
Most the skills I needed were covered in these 2 tutorials from CreatiCode Knowledge Base. I strongly recommend reading through both of these.
Don't let the Difficulty ranking scare you, I found them quite accessible. Not only do they explain the code quite well, they also help you understand how to use Prompt Engineering to get the result you want.
It was so much fun to play around with Creaticode to create my own AI Chatbot project about the Solar Eclipse.
Let me give you a tour of what I came up with. You can do this by clicking on the SEE INSIDE button of the project. (You'll need to be logged in to your Creaticode account to see this button)
Click on the sprite named Ripley, and let's take a look at the Code associated with our little astronaut.
You'll notice that I added music to kick things off with
But the key code for Ripley looks like this:
The first part of the code makes sure that Ripley shows up on the Screen in the correct location and the right costume. He then SAYS "Welcome everyone ..." and waits 2 second. I liked starting with a predictable static welcome message.
Then we dragged over the purple OPENAI ChatGPT request block and added a prompt that gives it a ROLE and instructions to create a dynamic response from Ripley.
You are an astronaut getting ready to experience a solar eclipse. You've never seen one before. Tell us how it feels to be waiting for this event of a lifetime. Keep your response to 50 words.
I used the following parameters for my ChatGPT requests.
The next few lines of codes were needed to display the chat streaming effect. Check out the Einstein Chat tutorial for a very thorough explanation of how this works.
The rest of the code sequence tells Ripley exactly what to say and makes him float around the screen while changing costume for visual interest. I wanted the instructions to be static and the same each time, so I coded those into a sequence of SAY blocks. In this Sequence of SAY commands, Ripley introduces the idea of a chat bot where you will be able to ask questions.
The final command in this sequence is the BROADCAST Command
This will send a message to the Rocket Sprite. You'll need to go and look at the code of the Rocket Sprite Code to see what happens when it hears the BROADCAST 'Show Rocket". But before we go, review the Rocket code below and try to imagine our Ripley Sprite following these commands.
Now let's take a look at the Code associated with the Rocket Ship.
You'll notice two sequences.
When we press the Green Flag, the rocket will hide and make sure its size is set to 100%. This will happen each time we start the program.
Next the Rocket ship LISTENS and it RECEIVES (or hears) someone broadcast "SHOW ROCKET" it will:
-Appear or SHOW itself on the screen, move towards Ripley,
-Start a sound
-Then glide off the screen, and "disappear/hide' - Finally it will switches the Stage Background to STARS.
Before we continue, let's go back to Ripley's code to see that the code that makes him disappear (HIDE) off the screen as soon as the Rocketship touches him. (This is to simulate him going into the rocket before it takes off)
Stay with me as I explain the final sequence of code, that I chose to associte with the Stage.
Click on the Stage, then examine the code.
We start by making sure the Galaxy background appears everytime we start the program.
Then we provide ChatGPT with a Prompt that includes a new role and some instructions for our Chatbot. Our goal is to create a telecommunication device to chat with Ripley after he blasts off. The Chatbot Widget is the perfect solution. But I don't want it to appear on the screen until after Ripley leaves in his rocket.
I triggered this by having the last command of the Rocket Code be SWITCH BACKGROUND to STARS
As you can see in the Code that belongs to the STAGE, there is a TRIGGER or EVENT that will only happen when the background gets switched to STARS.
Before we Add the Chat Window, we will use the purple OpenAI ChatGPT: SYSTEM request block to give ChatGPT a role with some rules for how it responds. Notice that this is the SYSTEM REQUEST code. This is the perfect code to use when you want to give ChatGPT instructions, but don't want an answer back.
After some experimentation with different PROMPTS, I found this PROMPT gave me the results I wanted.
You are an umpbraphile who was a great understanding of solar eclipse who helps students understand what will happen during a solar eclipse. Your responses are limited to 150 words or less. Do not respond to any questions that are not related to eclipses.
Now that you have given ChatGPT instructions, we are ready to add a Chatbot that simulates a communication device between the user and Astronaut Ripley.
The greenish blue Add Chat Window block makes a Chat Widget appear on the screen. I had to play around with the size parameters. I also played around with the STARS backdrop graphics by adding some TEXT instructions and a little rocket icon.
The last command (APPEND TO CHAT) in this sequence populates a message in the chatbot widget. I decided to start the chat conversation with a message from Ripley.
Note that the Chat message appended will include an icon of a Robot and say it is from RIPLEY
Okay - HANG In There! We just have one more CODE SEQUENCE to look at.
The next piece of code is triggered every time the user adds something to the INPUT box of the Chat Widget.
The sequence of code beneath When Widget Chat1 is clicked
is triggered every time the user types something into the chat.
The sequence starts with the APPENDS to the CHAT code and adds whatever the USER typed in (VALUE OF WIDGET Chat 1) Note that we decided to use the word "ME" with an icon of a USER in RED every time to user types something into the Chatbox.
The next steps (purple) is to Open Chat GPT and send it the words the user typed in (value of widget Chat 1) and add the response from ChatGPT to the Response variable.
Finally you need to add/append whatever is in the RESPONSE variable to our Chat Widget as a Chat message Note the changes that will make this appear as if it is from Ripley using the Robot icon in green.
And VOILA, with I had now created my first iteration of an AI Chatbot project.
According to CreatiCode "this is a strongly moderated version of ChatGPT, which will not respond to any request that’s not appropriate for a school environment." And yes, I tried a few just to test it! Did you notice the part of my prompt that made it so this Chatbot would redirect the user if they try to chat about something else than solar eclipse.
I'm already thinking of some ways to make it better, but wanted to leave my first iteration 'as is' so you can see how easily I was able to start using Creaticode to integrate AI into a block coding project after looking over just a few tutorials.
If you're new to Scratch, I would suggest starting with this tutorial
You'll have to Join and Sign In to see the code inside.
Why I'm so Excited about this!
So many reasons!
This platform is an accessible and school friendly way for students and teachers to start to understand AI. According to Creaticode, it uses "a strongly moderated version of ChatGPT, which will not respond to any request that’s not appropriate for a school environment."
I love that it works on a Chromebook and uses Scratch (a truly accessible way for even younger students to CREATE with CODE). Many of our students have experience with Scratch, so the interface and codes will be familiar to many.
I truly believe that Media Literacy should be included as an integral part of a child's education. But, too often, media literacy and digital citizenship are taught in a passive way. AI is rapidly becoming part of our world. Telling students about AI is not going to prepare students to live in that world. Creating projects with code that integrate AI using an accessible tool like CreatiCode and Scratch can help students better understand how AI works in the technology they are already using.
Douglas Rushkoff's message still holds true today. - Program or be Programmed.
Another reason that I'm excited is thinking about how this simple application of creating a AI Chatbot Project can add more hands-on tools for students to learn with and demonstrate their learning. I'm imagining project based learning where students are using and creating AI applications that are fueled by wonder, curiosity, and inquiry.
For those of you who design learning with UDL (Universal Design for Learning) principles, I think you'll agree that this application can fall in all 3 UDL categories (Providing multiple modes of representation, engagement, and expression).
I could go on, but I think I'll stop here for now -- Stay tuned for more reflection as I continue to explore and play.
In just a few days, most of the students in our Vermont schools will be experiencing an experience of a lifetime - A Total Solar Eclipse! A total solar eclipse is such a rare experience that at any given spot on the surface of the Earth, you would see a total eclipse only once every 400 years.
As an advocate of project based learning, I can't think of a better phenomena for creating project based learning around. Just ask Umbraphile, David Baron, or listen to his Ted Talk: You Owe It To Yourself to Experience a Total Solar Eclipse and you'll soon find yourself asking yourself all types of questions about this event, happening in our back yard on April 8!
Amazing educator's all over Vermont, are turning towards the Real World Learning that this event provides as a way to engage students towards deep learning. But don't be fooled into thinking that the deep learning possible is only in the science domain. The moon completely blocking the face of the sun for 3 minutes provides opportunities for learning in Math, Literacy, Science, Art, Engineering, and more.
This week, I was fortunate enough to interview 5th graders from Bellows Fall Middle School, who have been using their makerspace to preparing for the eclipse.
As I listened to them talk about how they searched for materials in their makerspace that could help them share their understanding of how a solar eclipse works, dozens of inquiry questions came to mind ranging from (but not limited to):
How might we represent the size of the moon and the earth proportionately?
How might we represent data we collected about cloud probability?
How might we help our community stay safe during the eclipse?
Although, hundreds of eclipse glasses are being distributed for free in just about every community around Vermont, Mrs. Redding did not pass on the opportunity for active hands-on learning for her fifth grade students. Not only did her students, create viewers for themselves, they also created viewers for everyone in the school district's central office.
They also shared the instructions with anyone who wanted to make their own, my making this video.
What I found interesting are that both the model of the solar eclipse and the eclipse viewer were very simple ideas -- something you could do tomorrow in your classroom. Yet both used hands on approaches that resulted in students deeper learning. Even making the video helped students gain language arts proficiencies.
Both were example of how Ms. Redding has leveraged integrating creating and making into their classroom. After attending Create Make Learn Summer Institute, Ms. Redding created a classroom makerspace. She regularly integrates makerspace challenges into her curriculum and constantly looks for opportunities to use materials and tools from her makerspace to make learning more engaging for her 5th grade students. She challenges her students to use the makerspace in a variety of ways like those in this padlet.
Other times, she designs instructions that where students use the makerspace to complete projects that directly align to a curricular unit. But one things that comes across to these 5th graders, is that their teacher is a maker and an educator who understands how powerful hands-on experiences are in the learning process, and her classroom makerspace creates a learning space where students can more deeply engage with the learning.


.jpg)


.png)


