Subscribe to this blog to get new learnings ideas, discoveries, and inspiration from the CREATE MAKE LEARN community, along with updates about our upcoming Summer Institute and Workshops.
Steps for Organizing a project with remote collaborators Step 1 for Organizers - Build Community & Select Script Step 2 & 3 for Organizers (Create Rehearsal Material and Setup Collection Process for Recording) Step 4 for Organizers - Communicate with other Remote Collaborators
and now it's time to pull it all together into a Final Production (Performance) which include Steps for the Video Producer and related collaborators
I like to use WeVideo for these steps for several reasons.
1) It is accessible and affordable
The fact that so many of our schools now provide a WeVideo EDU account to their students and staff in our state is a testimony to their commitment to Equity, UDL, and Creativity. School's made a big step towards digital equity when they moved to a one-to-one model providing one computer per student. The price of Chromebooks made this possible for many school districts. However, the Chromebook does not come with creativity tools that students who use laptops have access to. ALL students need access to video creation tools. So many schools have used $ on the savings from purchasing a Chromebook to add a WEVIDEO EDU license to the device, making it possible for ALL students to be able to create video projects and podcast projects ANYWHERE, ANYTIME!. That is definitely a sign towards Walking the Walk of Digital Equity.
Of course this also speaks to Universal Design for Learning - as students now have tools that can provide "Multiple Means of Expression" and "Multiple Means of Engagement"
The options for Project Collaboration has been part of WeVideo for a long time.
The key to collaborating is to make sure you choose the Collaboration Option when creating your PROJECT at the BEGINNING of the project. At this time, WeVideo does not allow you to change the Personal Project types to Collaborative Project types after they are created. If you just assume that you MIGHT be collaborating during your project from the GET go, you'll be able to invite collaborators later.
If the Video you are creating or editing is part of a Collaboration Project, you can invite others to edit the video in one of three ways. My favorite way is to use INVITE with a LINK and send the link to others when i'm ready to invite them. This works great if you can trust your collaborators to NOT share the link with others. If that trust is not there, then I would suggest selecting individual members from your organization. I rarely have need for EVERYONE in my organization to have access to a project.
Who Can Collaborate?
That's up to your WeVideo Administrator. I recommend that they turn this feature on for Students AND Teachers. Since Collaboration is one of the dispositions or habits of minds we are working towards in all of our students, why not use video projects as a vehicle to grow this skill in our students.
You also have to be in the same ORGANIZATION to collaborate. Currently there is no feature to allow for collaboration between schools/orgs. One tip for inviting others from outside your school to become collaborators (i.e. author, mentor, etc) is to ask your admin to save a couple WeVideo licenses for outside collaborators. You can invite them for a "short period of time" then reclaim the license and reuse the license for a different outside guest to collaborate with your students.
(You can get started with a free account, but will need to upgrade to access certain features)
1. Click on PROJECTS.
If you are starting a new project, Select Create a New Project by hovering in the upper right hand corner.
If you are trying to access a project that you created earlier or one that someone else invited you to simply click on PROJECT in the side menu and select MY Projects or Projects Shared with Me.
You can create as many videos as you want inside a collaborative project and all members of the project will be able to edit any of these videos. Everyone who is a member will also be able to access ANY media located in the PROJECT Media folder.
To invite remote collaborators to a project, you can RIGHT CLICK on the project name and click INVITE Collaborators.
2. ADD and Organize Media
As we saw back in earlier post, there are several ways that collaborators can contribute to the project as actors, artists, singers, etc without being invited to EDIT the Video.
Check out this post in the Steps for Organizer to learn how to set up a Drop Box Request or a Google Drive to collect media from many remote collaborators.
It is important to note that the MEDIA DOES NOT become accessible to the whole project until the project organizer follows BOTH of these two steps.
--- Import MEDIA into his/her WEVIDEO account from Drop Box or Google Drive
--- Right Click on the media and SHARE TO PROJECt
Once both of these steps are complete, all members of the project can access it. Here is a short video that demonstrates these two steps.
Keeping media organized in FOLDERS is most helpful.
Use the New Folder icon in the newWeVideo interface to create a new folder
You can also Right Click in the My Media interface.
2. Getting Oriented to WeVIDEO Layout
4. Add the Script or Instruction via Google Doc as a Linked Resource
An often overlooked feature of WeVideo is the ability to add Google Docs to linked resources.
4. Adding the Actors to their own Video Tracks
Drag each actor's video to its own track.
Rename the Track
Add a Video Track called ALL ACTORS
Resize and Reposition the Individual Actor Videos as you add them to the track Note: Important to do this BEFORE you start splitting and trimming the videos. Crop as necessary using WeVideo's new Crop Video tool. Double click on the video to get the following controls.
If desired you can add a Background slide with Green Screen Cutouts on its own Track.
This track needs to be above all the Actor Track.
I created the above background slide in Google Slides. While in Google Slides - Add Shapes Remove the border of each shape and fill it with a green to use the green screen effect in WeVideo.
Download the background slide as a PNG and import it to WeVideo Media / Project Media folder.
Use the Color to remove the Green so color and allow the actors videos to show.
Adjust the actor position and size until you are pleased with the effect.
5. Splitting and Sequencing the Actor's contributions
Split and Trim each Actor's video into sections Zoom in and use the sound waves to make this easier.
Delete the scraps (or dead air)
Drag each actor to the ALL READERS Track in the correct sequence
Test as you go muting and unmuting as necessary
6. Adding aa Title and Credits
Use the Title features to add Titles and Credit
Add Animation, Graphics, as desired
Use WeVideo Essential or make your own
7. Add Music and Sound Effects
Use WeVideo Essential or make your own
8. Finish and Export your Video
Decide on privacy setting and where you would like to export to live
And VOILA!
Your Readers Theatre Performance of Video Project is Ready to SHARE with your Audience!
Having a buddy system between the remote artists can help everyone feel connected to the community and to the whole project. It is important to also honor the preference of those who prefer solitude when learning their part.
Step 2: Set Up Your Shot
If you are reading from printed material, you will only need ONE recording device. Most smartphones have great microphones and decent video cameras.
If you are reading from online material, you'll want a playback device and a recording device. I would use my laptop or a chromebook as the playback device and a phone as a recording device.
If you are recording, while listening to a guide video you'll need headphones set up to your playback device.
If you have one handy, grab a tripod for your recording device to keep it steady as you record.
You can also create a DIY tripod from a cracker or cereal box.
Position your phone in the landscape mode.
Think of the orientation of your TV and position your recording device so that it also captures this landscape orientation.
Position the guide script you are reading from or watching at eye level as close to the recording device as possible so it looks like you are looking into the CAMERA, not glancing away.
Select where you will be recording.
You'll want to avoid places where cats, pets, family members might be making unexpected appearances or background noise. You'd be surprise how loud dishes clanking in the background can sound, no matter how quiet your family members are.
Don't forget to turn off fans, air conditioners, or noise machines. Sometimes even a fluorescent light can create background noise.
Beware of wind noises that come from recording outside.
Take a second to clean up the background from clutter or distracting items. Keep your background simple, cheerful, and inviting.
Play with the lighting
Avoid having a window or bright light BEHIND you. This will make you look like a silhouette.
If you are using a green screen, you also want to eliminate as many shadows as possible.
Can you position yourself so you are facing a window or light source, placing the the camera between you with a light source or window behind the camera?
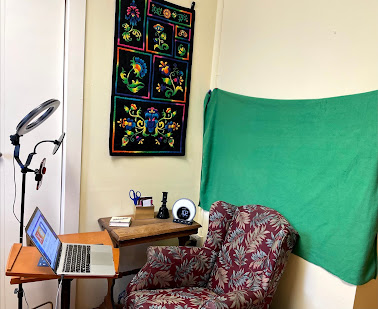
Here is the very mobile setup I have using an inexpensive ring light and a wrinkle free green fleece fabric that I can tack up when I want a green screen.
You can also use a an outside window or a household lamp with an LED bulb to shine light on your face from behind the camera.
Step 3: Submit Your Recording
Avoid emailing or texting your recording. This will compress the video and the reduce the quality of the sound or video.
The instructions from your director or organizer should include include directions on how to submit your recording.
Using a DropBox or Google Drive upload will result in much better workflow for those assembling the video. This recent post outlines 3 different ways that your organizer might use to collect your recording.
I'm so excited to be part of Spring Cue 2021 tonight. My session Creating Virtual Video Projects with Remote Collaborators is framed around what we learned while making Video Projects with Remote Collaborators this year. I'll share the top 10 things that will help anyone making media with remote collaborator.
During this step it is important that the organizer, director, and video producer collaborate on some key decisions.
"What methods would work best for actors/singers to record their individual parts.,"
Here are two approaches we considered along with the pros and cons of each option.
In Option 1, the organizer creates a rehearsal slide deck along with a rehearsal video. Actors use the rehearsal video when recording their lines. They remain quiet when its not their turn to record, and speak their lines at the appropriate time during the recording. This is sometimes called a click track. Each actor starts by CLAPPING Loudly at the beginning of the video. This clap helps the video producers align the tracks. This method requires more pre-production work time to create a guide video. It is the best choice if singers are trying to sing in-sync. It can also be used for other type of projects such as readers theater. The pacing of the guide video might be hard to predict. Readers might read faster or slower. The video producer can make some manual adjustments to accommodate for slow readers during video production.
In Option 2, the organizer creates a rehearsal slide deck like his one. Actors use this rehearsal slide deck to practice and record their lines. They quickly manually advanced through the slides that do not contain their lines and only read their lines. They make sure to pause at least 3 seconds after each set of lines they record.
The video producer will import each actors' video on one track, then use the pauses to split and trim the video into segments. Then they will drag each segment to a new video track to reorder the segments. This will require more post production work, but the pacing will appear more precise. In this method, the actors will only be on 'stage' during their lines.
Use this template to create a rehearsal Guide for Option 2.
Depending on your teams confidence with tech, it might also be helpful to publish the slide deck and COPY published link to share with your TEAM. This will allow them to OPEN the published LINK in one tab and to easily advanced the slides manually as needed in full screen view.
This is also super helpful when you are using the same computer to display the script and to record.
Another consideration that the organizer, director, and video producer must consider is
'What method will you use to collect recordings or media assets from collaborators."
It is also important to Collaborate with your director and video producers to decide which method(s) will work best for your project.
Here are 3 options starting with the easiest method first.
Setup a Drop Box- File Request to Collect Recordings
The easiest method for those submitting files. Also most secure.
No need for a Drop Box Account; No need for Google Drive. Everyone can do this.
Organizers needs a Drop Box account
Can use FREE version of Drop Box (Up to 2 Gigs)
Set up a Google Drive to collect recordings
Works well if your artists/ singers are already use to collaborating
with Google Drive and all have Google accounts
Works well for those who are already using Google Classroom
Requires the Google Drive App
Record directly into WeVideo
Works well if your users already have WeVideo accounts.
Works well if users will be invited to be PROJECT collaborators
to the project inside WeVideo.
(See slide on how to SHARE your MEDIA to PROJECT MEDIA
in WEVIDEO)
WeVideo media clips can be downloaded to your hard drive
and sent to organizers using method 1 and 2 above.
The method you chose will depend on several factors.
If you and your actors are familiar with Google Drive, this may be the best options.
If some of your actors don't have access to or are unfamiliar with Google Drive, Drop Box makes it soo easy. You may need to upgrade to the paid version of Drop Box if the recordings will exceed the 2 Gig liitation of the free version.
If your group has access to WeVideo EDU, you might choose to have them record directly in WeVideo. You might
Stay tuned for the next post where we'll share Step 4 in the organizer's process