Subscribe to this blog to get new learnings ideas, discoveries, and inspiration from the CREATE MAKE LEARN community, along with updates about our upcoming Summer Institute and Workshops.
Yesterday we completed the first 10 of the puzzles in this CODE.org lesson teaching Anna and Elsa to create designs with their skates and also teaching the Scratch cat to do the same using SCRATCH.
Today we will continue to grow our confidence with code as we complete the last 10 puzzles of this CODE.org sequence on both CODE.org and SCRATCH.
With Puzzle 10, we learned to draw a parallelogram.
In Puzzle 11, we use the REPEAT code block to draw 4 parallelograms evenly spaced apart, turning 90 degrees before drawing the next. Note that 360 degrees divided by 4 tells us that our angle turn should be 90 degrees.
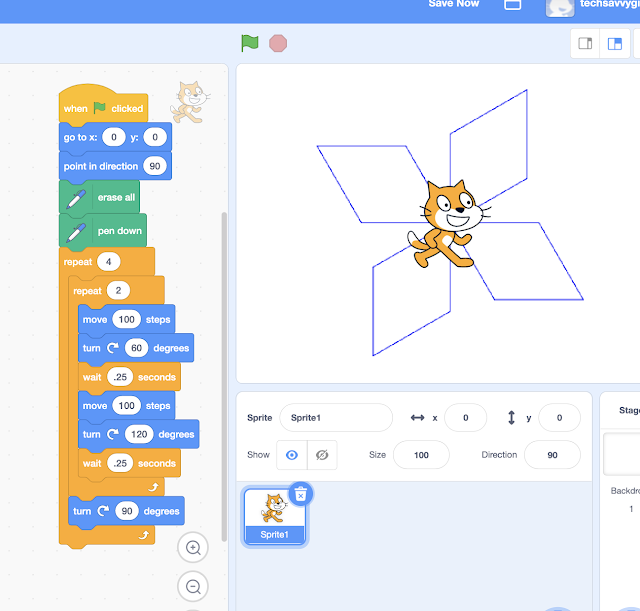
Can you make the Scratch cat draw 4 parallelograms evenly spaced apart, turning 90 degrees between each? Hint: you could use 2 nested blocks to complete this task.
Notice the 2 loops that will be used in this code. Can you put these 3 code sequences in the right order to complete the design above?
Give it a try!
Does your CODE look like this?
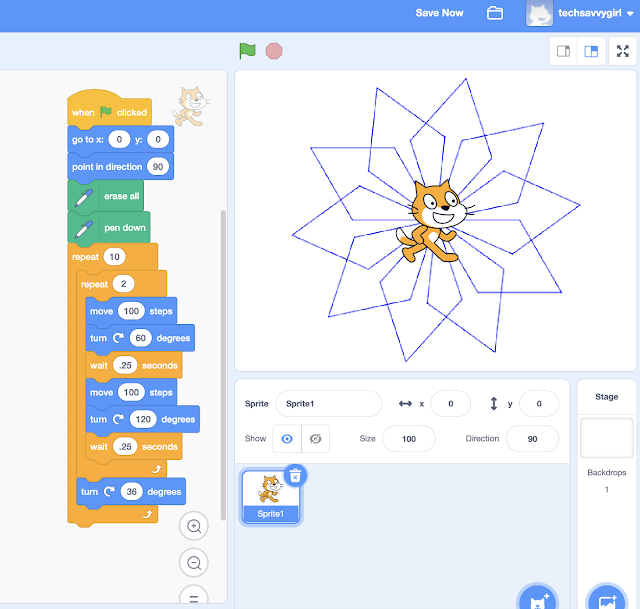
In Puzzle 12, we are challenged to create a similar design with 10 parallelograms. You'll not only need to change the REPEAT, you'll also need to change the number of degrees you turn in between each parallelogram. (Remember that a circle is 360 degrees)
Go ahead and try to complete this challenge using the FROZEN tutorial and then code the Scratch cat to also create this design.
Does your code look like this?
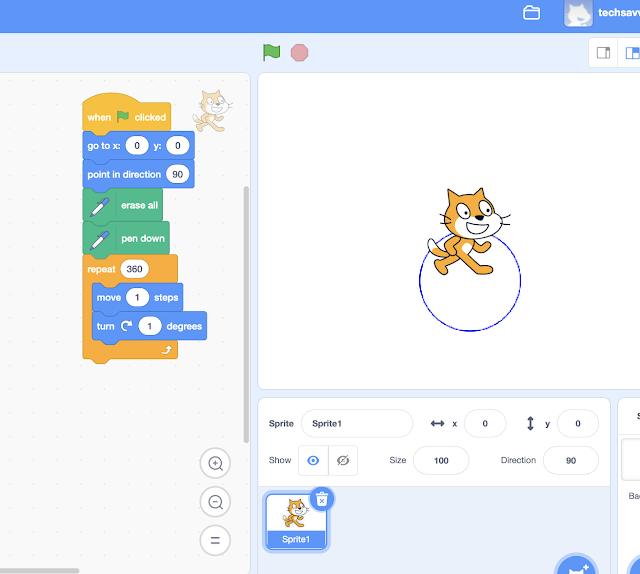
In Puzzle 13, we learn to draw a circle by drawing one step, turning 1 degree, and repeating that process 360 times. After completing the FROZEN tutorial, go ahead and code the Scratch Cat to draw a circle.
Does your Code look like this?
Puzzle 14 is introduces a very important skill -- Creating a Function!
This CODE.org video does a GREAT job explaining why Functions are so important. After completing Puzzle 14 in the Frozen tutorial, we'll want to create a similar function in SCRATCH.
Because Scratch does not have a JUMP command, we will also be creating a function that allows the Scratch cat to jump along with a function that creates a circle.
Let's get started!
Learn to use the MY BLOCKS feature in Scratch to create
a function and complete the Puzzle14 task.
Watch this video to learn how to create a function in Scratch
that will create a circle and a function that will JUMP.
In Puzzle 15 you will use your newly created Circle Function to create 20 overlapping circles. After you complete the puzzle in CODE.org try to code your Scratch Cat to create the same design.
Does your code look something like this?
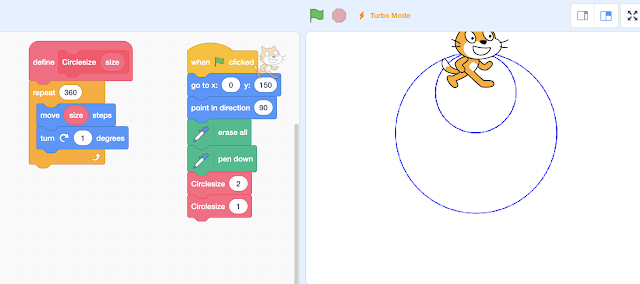
In Puzzle 16, we learn how to make different size circles.
Watch this video from Colleen Lewis to better understand drawing circles in Scratch. (Note: if the circle is too big and goes outside the canvas, the results are unpredictable and this formulas appears not to work when the sprite draws off the visible screen.
To successfully complete this mini-lesson, you'll need to learn how to add a PARAMETER to your Function using MY BLOCKS. I created this video to show you how.
Now that you're feeling more confident with using MYBLOCKS in Scratch to create functions, completing Puzzle 16 should be a breeze. First try the Code.org puzzle, then try to do the same using Scratch.
Does your code look something like this?
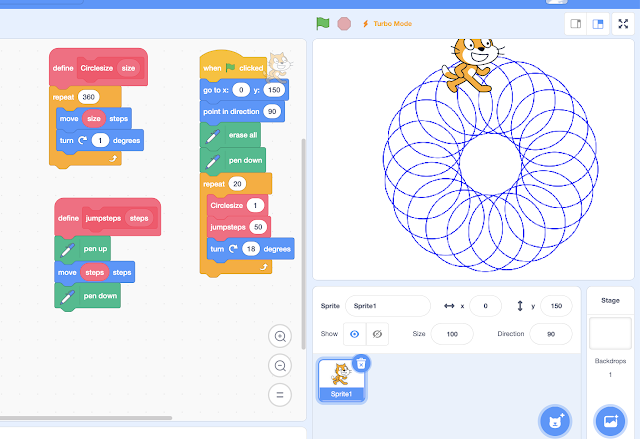
In Puzzle 17 you are challenged to create a pattern with 5 repeating circles of one size and 5 more repeating circles that are smaller. You'll use the Circle Function you created earlier. (For a uniform pattern, remember that 360 degrees / 5 is 72 degrees.)
Important Note: Keep your steps smaller than 2 in Scratch if you want your circle to fit on the canvas. You can try to step 1.5 steps. If you get circles that don't close, try a smaller step in your move command.
Let's see what pattern you come up with. Does your code look similar to this?
During Puzzle 18, you'll actually start to create a snowflake using functions that the folks at Code.org have created for you called "Snowflake Branch". You will take their "SnowFlake Branch" function to create the beginnings of a snowflake. Watch carefully as the snowflake branch is being drawn and start to think about what code you would use to create that SnowFlake Branch function yourself.
Before you hop back to Scratch, go ahead and completePuzzle 19 in the Code.org lesson. Look at that beautiful snowflake.
Are you ready to use Scratch to create your own SnowFlake Branch.
Let's start with a NEW Scratch Project.
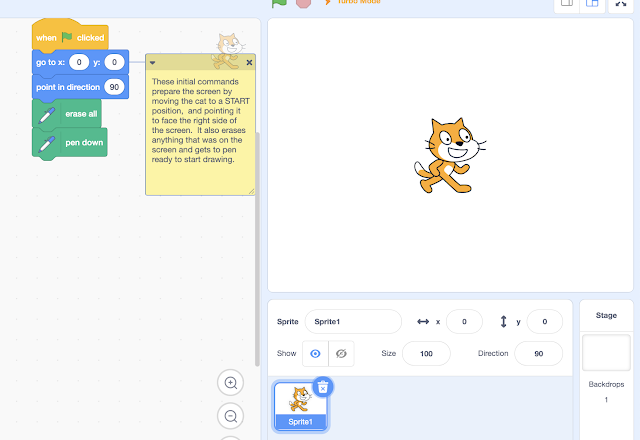
First SETUP these initial commands that you need at the beginning of your snowflake program.
If you have not used the SHOW and HIDE commands this would be a good time to drag them out and make them part of your project. Why not start every program by showing the CAT and ending your program by HIDING the CAT.
Let's start by creating a very simple branch using code you already know how to use.
The next step is to decide how many times you would like to repeat your pattern to form a Snowflake Branch. Add the repeat code to accomplish this, then add CODE that brings the Scratch cat back where it started. Note: the number of times you repeat the pattern impacts the number of degrees you should turn.
How about creating a JUMPSTEP function that allows you to move the cat without dragging the pen or drawing lines on your canvas.
This could be helpful to bring the cat back after each branch is drawn.
When you are done, compare your code to my code. Does it look similar?
If not, does it still do the job?
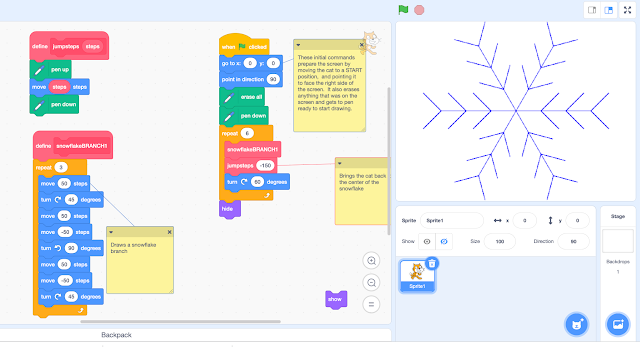
Now that you are getting good at functions, why not move the code you wrote to create your first snowflake branch and use it as part of a new function called SNOWFLAKEbranch. You'll use MYBLOCKS to do this.
Once you have done that, you can use create a snowflake simply by using both the SNOWFLAKEbranch function and the JUMPSTEP function and adding code to turn your cat before it draws a new SnowflakeBranch.
Here is how I did it. Does your code look similar?
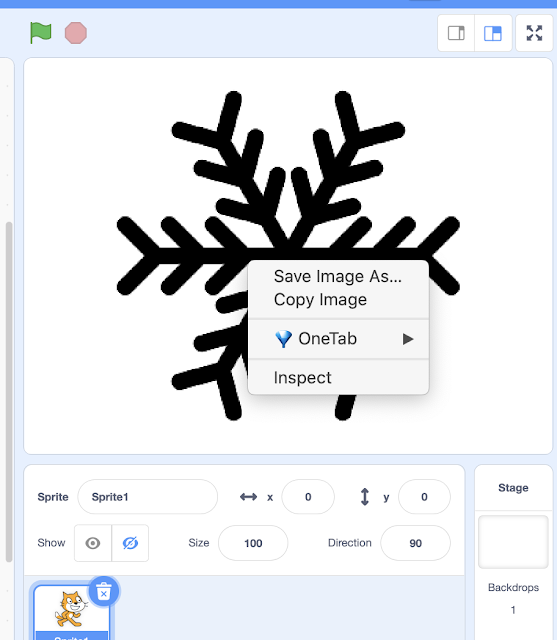
Let's make one final touch that will help prepare our snowflake to be cut out of maker tools or 3D printed. generated. Let's make the branches thicker and darker. I used BLACK as pen color and 15 as my pen size to get the result below.
You might be tempted to use a different color, but a black snowflake with thick lines will generate the best CUT when we get to the next step.
Congratulations, you now have the skills you need to create several different snowflake branches.
These final steps will result in a SNOWFLAKE svg file that can be used to create a real physical version of the snowflake you coded..
Step 1. Hide the sprite. Then Right Click and SAVE the IMAGE. It will be saved in PNG format. Rename it to make it easier to remember.
2. Navigate to an SVG converter site like PicSvg.com and upload your snowflake.
Play with the filters until you find one that gives you the desired RESULT.
Hit DOWNLOAD SVG. It will download to your computer, where you can rename it.
I created a a short video that walks you through these steps.
Once you have an SVG version of your creation, you can upload it to several maker tools to make something you can 'touch'. I can't wait to see what you will create with your Code.
In the next post, I'll demonstrate how to upload your SVG into various maker tools so you can 3D print it or cut it from a laser cutter or other computer controlled cutter (i.e. Cricut, Silhouette)
Meanwhile, you can keep playing with code and putting your new skills to the test by creating new designs.
And finally in Puzzle 20, you get to design your own creations with code
or head over to Scratch and make your own designs.


.png)

No comments:
Post a Comment