This year's Computer Science Week was a little different for me. I usually spend it trying to encourage as many schools as I can to participate. I also
This year, I spent some time designing materials that could scaffold students and teachers who are interested in physical computing as a way to engage a more diverse population with computer science.
Let's walk through the steps you need to create confidence with coding your own snowflake artifact.
Start by watching the 3 minute introduction, then go ahead and complete the 20 puzzles in this CODE.org tutorial. By end of the tutorial you will have the skills you need to code your own snowflake.
HOWEVER, if you want to MAKE your coded snowflake into something personal with your laser cutter, vinyl cutter, or 3D printer, you will need to use a different platform to code your snowflake. Let me show you how using Scratch from MIT.
In the next few posts I'll walk you through what you would need to know to complete the 20 puzzles that Anna and Elsa teach us using SCRATCH. Then we'll convert our final design to a file you can cut out, etch, or 3D print into a physical artifact.
First you'll need to create an account on Scratch . Once you have an account, click on CREATE to get started.
In order to get the code blocks we need for this project, ADD the PEN Extension. The icon for ADDING Extension can be found in the lower left navigational bar. Once you add the PEN Extension, a new set of GREEN code blocks will be at your disposal.
Go ahead ahead and explore using some of the PEN Extension commands.
Once you are ready, I would suggest completing each of the 20 puzzles in this CODE.org tutorial and also try to achieve the same task in SCRATCH.
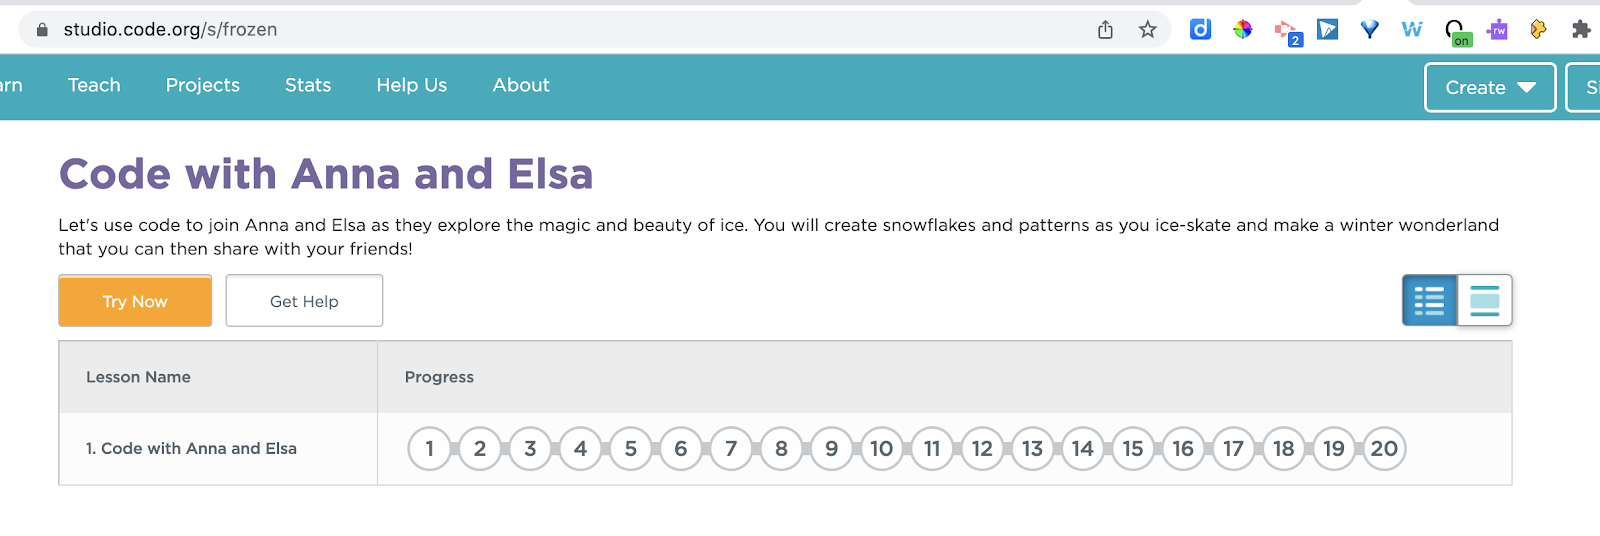
Let's load the Elsa and Anna Code.org tutorial Click on Try Now
https://studio.code.org/s/frozen
The first Code.org puzzle teaches you how to draw a single line
After you have helped Elsa create a single line, go ahead and code the SCRATCH cat to accomplish the same task. Your code should look like this.
NOTE: Make sure you have added the PEN EXTENSION or you won't seen the green PEN DOWN block.
In Puzzle 2 you'll learn to turn and create a second line.
Once you have completed Puzzle 2 on the CODE.org tutorial, let's make your Scratch Cat do the same
One thing you might notices is that the folks at CODE.org reset ELSA and ANNA after every lesson so they are ready for the new lesson.
Let me show you how you can do the same thing with our Scratch CAT
If you add a few SETUP commands after the GREEN FLAG is clicked, the Scratch Cat will be ready for you to code your next lesson.
Go ahead and Add the commands below.
NAME and Save your file.
Now when you hit the Green Flag, the Scratch program will reset the Scratch Cat and erase the screen,
and put the PEN down so it can draw.
The WAIT command gives you a chance to see the Cat in Position.
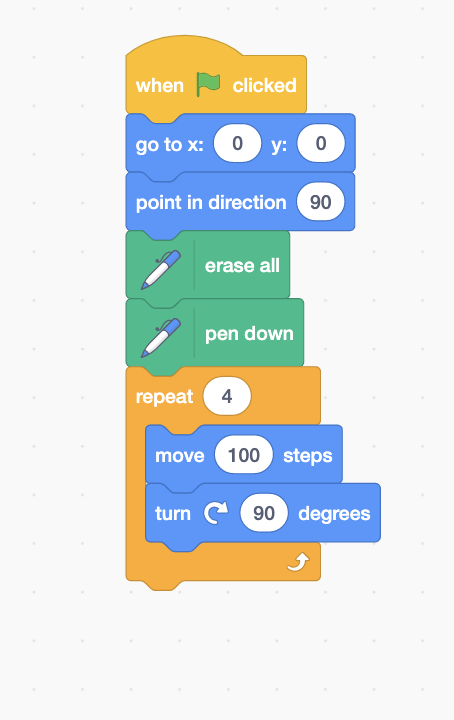
Great now you're ready for Puzzle 3 from Code.org where you teach Elsa and Anna to draw a SQUARE with their skates. After you complete Puzzle 3 and successfully code a square with Elsa and Anna, let's code the Scratch Cat to also draw a square. In the rest of the post, I'll describe the challenge, tben show you the solution for completing this tasks in Scratch. I would suggest you give it on your own before you scroll down to look at the Scratch solution code.
In
Puzzle 4, you'll learn to use LOOPS to make your code more efficient.
This CODE.org video does a great job explaining how Loops work in computer science. Once you have successfully used a Loop with Elsa and Anna, you'll want to use a LOOP to help your Scratch Cat draw its square.
Give it a try.
Does your SCRATCH code looks something like this ?
Once you have mastered One Loop - how about working with several loops at once. Puzzle 5 introduces NESTED Loops. By using NESTED Loops you can use one loop to draw your square, and then use a NEW LOOP to draw 3 squares while turning 120 degrees between each square.
Your nested loop code should look similar to this
See how evenly spaced your SQUARES are! An important note is that to space a shape evenly around a CIRCLE, you'll need to know that the number of turns you take should equal 360 degrees. In the last example there were 3 turns, so we divided 360 degrees by 3. That tells us that each turn should be 120 degrees.
How many degrees do you think you should turn if you want to draw 10 squares around a circle?
Give it a try? Change the REPEAT value to 10 and also change the degrees of the turn to 360 divided by 10.
Do it first with Elsa and Anna, and then come back and repeat the process with the Scratch cat.
Give it a try.
Does your Code look something like this after Puzzle 6.
In Puzzle 7, Code.org introduces a MOVE BACKWARDS command to help Elsa and Anna draw a plus sign with their skates.
In Scratch, there is no MOVE BACKWARD command. In Scratch we move move backwards by adding a negative sign to the number of steps you are moving.
Can you draw a cross using Scratch.
Give it. try before looking at the solution below.
Note the NEGATIVE Sign being used to get the Scratch Cat to move backwards.
I
n Puzzle 8, you will move backwards and forward as well as turn to create a star like figure with 10 lines.
How many degrees will you need to turn between each line to end up with a beautiful star like shape made from 10 lines?
Does your Scratch code look something like this?
In Puzzle 9, you need to change the angles so you can code 90 lines around the circle to create a starburst look.
How many degrees do you think you will need to turn to do this?
Give it a try!
Does your code look like this?
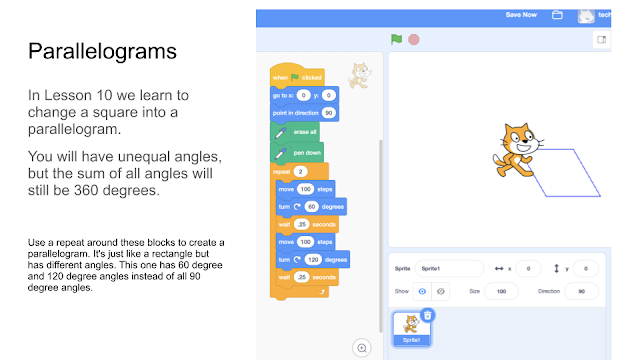
For Puzzle 10, we'll change the angles of the square to create a Parallelogram.
Then try to code a parallelogram.


No comments:
Post a Comment