

In the previous post, we used Makey Makey and Scratch to make physical objects interactive by adding the ability to generate fun sounds when you interact with them.
In the next few posts, we will actually CREATE a design using ALGORITHMS and then use MAKER tools such as laser cutters, vinyl cutters, or 3D printers to MAKE a product that uses the design that we CODED.
Let's start with coding designs that you can use with cutting tools. I happen to have a Cricut Maker and a Glowforge laser cutter in my maker-space, but you can use this workflow with any maker tool that imports SVG (vector files). In the next post, we'll play with 3D printers.
Imagine wearing earrings that you created with code or sporting a shirt or some jeans that have a design that you created with code. Could your night light include a design you created with code. The possibilities are endless.
But first let's briefly examine WHY you would want to to CODE a DESIGN instead of draw one or download one from ETSY.
Of course, one reason is to develop skills in computational thinking. Others might find this approach an introduction to computer science or learning to code. Each of these are different but related and all value the transferable skill of creating and understanding algorithms. This brief video from Digital Promise does a great job describing the importance of computational thinking in our computational world.
"engaging all learners in computing, connecting applications to students’ interests and experiences, and providing opportunities to acknowledge, and combat biases and stereotypes within the computing field."
If we want to change the Dave to Girl Ratio we must create opportunities for under-represented populations to create confidence and interest in tech and computer science. Creating beautiful and colorful objects that you can 'touch and feel' is one way to engage a broader audience with computer science.
 |
| The Cricut Maker was a popular choice during TechSavvy Girls Camp 2018 |
I would not advocate that Coding a Design is the only way (or best way) to produce artifacts with maker tools. It's just ONE way. But it does provide a way that engages students in the learning process with HARD FUN.
Engaging students with fun does not have to be 'make it easy". Seymour Papert dedicated his career to creating environments that included hard fun.
Once I was alerted to the concept of "hard fun" I began listening for it and heard it over and over. It is expressed in many different ways, all of which all boil down to the conclusion that everyone likes hard challenging things to do. But they have to be the right things matched to the individual and to the culture of the times. These rapidly changing times challenge educators to find areas of work that are hard in the right way: they must connect with the kids and also with the areas of knowledge, skills and (don't let us forget) ethic adults will need for the future world. ~ Seymour Papert
Learning through Hard Fun while coding, creating and making is a great way to help students develop the growth mindset that can change the way they learn across all content areas. Carol Dweck and Jo Boaler offer some concrete research on this topic in this article.
For additional research on Hard Fun, check out Nicole Lazzaro's model Four Keys to Fun.

In the workflow of CREATING Code You Can Touch outlined below, students spend some time EXPLORING some FUN tools. We start with a LOW FLOOR tool (like Scratch) which can quickly have students feeling CONFIDENT. As students are MOTIVATED to PRACTICE further we provide CHALLENGES which leads to OBSTACLES that can be overcome. As MOTIVATION increases to further EXPLORE leads to new ORIGINAL DESIGNS leading to CREATIVE CONFIDENCE with CODE. If this sounds a bit like game theory - it is! The best games are HARD FUN.
Walking away with a Physical Artifact that you CODED is like giving birth to something that you will treasure and that object becomes a physical reminder of the GROWTH MINDSET and sense of MAKER EMPOWERMENT you gain during the process.
Start by INSPIRING students with some amazing examples from @CeMoCreates and @morrill_rob

Or why not create a few of your own examples to provide students some artifacts they can actually touch!
Although there are lots of great examples of ART created by CODE, I would suggest starting with some unplugged activities to introduce your students to algorithms while moving and turning around a room using angles and degrees as units.
To start CREATING CONFIDENCE with basic algorithms consider using SCRATCH by MIT and the PEN Extension
.png)
.png)

.png)
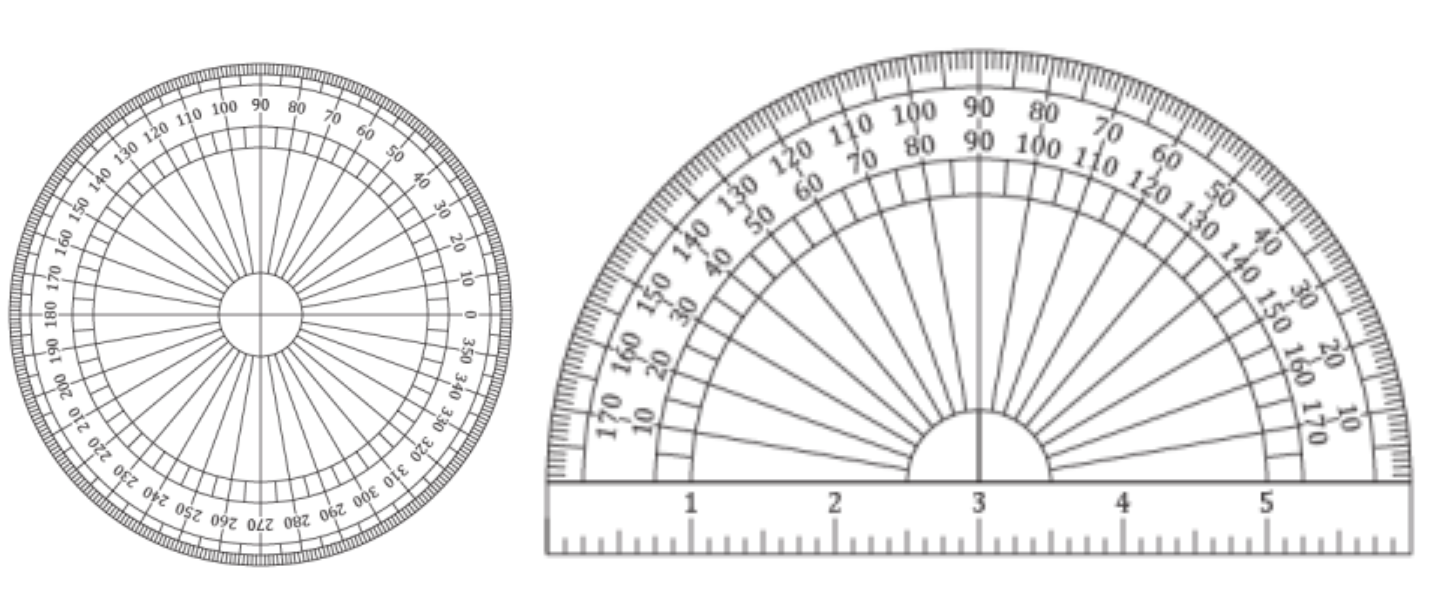


Once you feel confident with predicting what direction your sprite will move next using the POINT in DIRECTION block, it's time to start playing with the TURN DEGREES block.
Point in Direction Block
The blocks points the sprite in a specified direction and moves within 360 degree angle.
Example; pointing the cars towards their destination.
Turn Degrees Block
These block turn the sprite in specified amount of degrees , it can be either clock wise or counter-clock wise. It can change the direction where the sprite is facing towards.
- Experiment with these two commands until you truly understand these.
- Try different numbers.
- Use the protractors to predict what will happen.


Did you know that you can change the background in SCRATCH.
Try adding the X,Y coordinate grid background
.png)
.png)


Here's a great video to introduce the concept of using REPEAT (LOOPS) when drawing POLYGONS
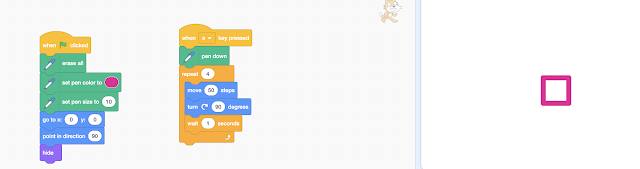
Here are two more challenge cards you can try with your new skills.


Can we MERGE all the pieces of code so that we

using different polygons and different values for the TURNS.

it's time to create your physical artifact.
I would suggest making sure the pen color is BLACK and the background is WHITE.
This provides a contrast that will lead to the best outcome.
You'll need to delete or hide the BACKGROUND if you used the XY Grid.

you can IMPORT it into an SVG FILE CONVERTER like www.picsvg.com
You might not get the EXACT replica of your design, but I know it will be a fun and beautiful design that you will feel proud to have coded.

Your final step is to Download your SVG file and

No comments:
Post a Comment