This post is part of a series on Making Video Projects with Remote Collaborators.
We recent post we discussed
Building Community and Engagement in the projectPreparing Scripts and MaterialsSetting up a collection method for recordings and other assets
This post will shift the focus to the Remote Artists/ Singers/ Dancer/ or Performer
Step 1: Learn Your Part
Of course the first step is to use any rehearsal slide decks or guide videos that your organizer or director provided you. Whether you use a rehearsal slide deck such as the ones we shared for our Readers Theater Project or a virtual choir guide video such as the the ones found in the these virtual choir kits, or whether you create your own, make sure you set aside time to become comfortable with the material.
Having a buddy system between the remote artists can help everyone feel connected to the community and to the whole project. It is important to also honor the preference of those who prefer solitude when learning their part.
Step 2: Set Up Your Shot
If you are reading from printed material, you will only need ONE recording device.
Most smartphones have great microphones and decent video cameras.
Most smartphones have great microphones and decent video cameras.
If you are reading from online material, you'll want a playback device and a recording device.
I would use my laptop or a chromebook as the playback device and a phone as a recording device.
I would use my laptop or a chromebook as the playback device and a phone as a recording device.
If you are recording, while listening to a guide video you'll need headphones set up to your playback device.
If you have one handy, grab a tripod for your recording device to keep it steady as you record.
You can also create a DIY tripod from a cracker or cereal box.
Position your phone in the landscape mode.
Think of the orientation of your TV and position your recording device so that it also captures this landscape orientation.
Position the guide script you are reading from or watching at eye level as close to the recording device as possible so it looks like you are looking into the CAMERA, not glancing away.
Select where you will be recording.
You'll want to avoid places where cats, pets, family members might be making unexpected appearances or background noise. You'd be surprise how loud dishes clanking in the background can sound, no matter how quiet your family members are.
Don't forget to turn off fans, air conditioners, or noise machines. Sometimes even a fluorescent light can create background noise.
Beware of wind noises that come from recording outside.
Take a second to clean up the background from clutter or distracting items.
Keep your background simple, cheerful, and inviting.
Keep your background simple, cheerful, and inviting.
Play with the lighting
Avoid having a window or bright light BEHIND you. This will make you look like a silhouette.
There are many tutorials online describing the function of each light in a 3 point lighting setup. These can help you understand the impact of lighting, however you don't need a fancy setup. Just make sure your light source is NOT behind you making you look like a silhouette.
If you are using a green screen, you also want to eliminate as many shadows as possible.
Can you position yourself so you are facing a window or light source, placing the the camera between you with a light source or window behind the camera?
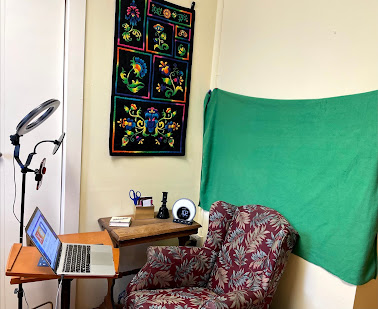
Here is the very mobile setup I have using an inexpensive ring light and a wrinkle free green fleece fabric that I can tack up when I want a green screen.
You can also use a an outside window or a household lamp with an LED bulb to shine light on your face from behind the camera.
Step 3: Submit Your Recording
Avoid emailing or texting your recording. This will compress the video and the reduce the quality of the sound or video.
The instructions from your director or organizer should include include directions on how to submit your recording.
Using a DropBox or Google Drive upload will result in much better workflow for those assembling the video. This recent post outlines 3 different ways that your organizer might use to collect your recording.
You can find a free download of directions created specifically for singers on the free-stuff page at PoddBrothers.com


I am glad to found such a useful post. I really increased my knowledge after reading your post which will be beneficial for me.
ReplyDeleteWe invite you to visit our website for flex print.