In my recent posts, I introduced a #WAOTL series where you and your students might experience computer science by using Scratch to create and code an interactive experience with bioluminescent characters from the children's book "Whose Afraid of the Light" by Anna McGregor.
Here are the posts in the series so far
Today's post will Kickoff the first of 5 challenge cards you and your students can use to create the interactive experience
In Challenge 1 students will create and code characters from one of the 2024-2025 Red Clover Book Award nominees.
Here is a Sample completed project to Challenge 1
Start by creating a NEW Scratch project at http://scratch.mit.edu
Your students may access Scratch in the following ways depending on district policy.
To start the challenge have your students draw one (or all four) characters from the book.
.png)
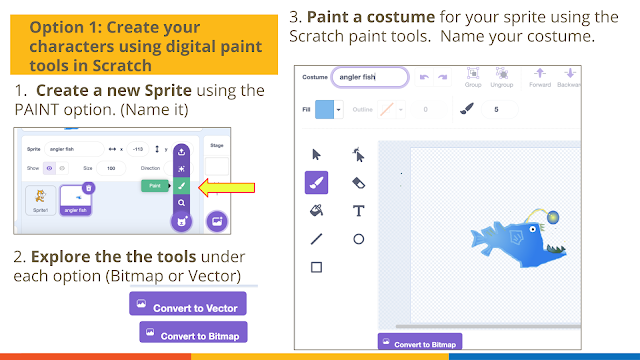
Your students can draw a character from the book using the digital paint tools built into Scratch. The Scratch interface allows you to switch between Vector drawing tools and Bitmap drawing tools.
Tip: When you are in vector mode you will see a button that says
Convert to Bitmap. When you are in Bitmap mode that button will say Convert to Vector.
Now it's time to add Code to create a blinking/glowing effect. Click on the CODE Tab for your sprite. Drag out the following blocks of code.
Your students may access Scratch in the following ways depending on district policy.
- No login (Save projects to your own computer or Google Drive)
- Use Scratch Teacher account to create student accounts which they supervise.
- Students create their own accounts with parental permission.
To start the challenge have your students draw one (or all four) characters from the book.
.png)
Your students can draw a character from the book using the digital paint tools built into Scratch. The Scratch interface allows you to switch between Vector drawing tools and Bitmap drawing tools.
Vector graphics in Scratch allow you to draw shapes that remain smooth and crisp at any size.The vector editor uses points and curves to define shapes mathematically.
Bitmap graphics in Scratch) work with individual pixels. the images can become pixelated when enlarged.
I like the the vector editor because it uses a layer approach to more easily change parts of projects when editing different costumes. However, the bitmap editor comes in handy at times also. Watch this 5 minute videofrom STEAMIST to see which tools are available when in vector or bitmap mode. I would suggest guiding your students through an exploration of each of these tools
Tip: When you are in vector mode you will see a button that says
Convert to Bitmap. When you are in Bitmap mode that button will say Convert to Vector.
Your students can choose to create hand drawings of the characters. I go over my workflow for this option in step by step details in my previous blog post.
Now that your students have created or imported characters from the book in a Scratch Project...
Let's DIVE INTO CODING AN ANIMATION
I would encourage you to create your own sprites, but here’s a Scratch Starter Project you can use if you’d like to learn to code an animation without completing the previous steps. In this starter project, you will find 4 sprites already created by young learners, so you can dive right into learning to code an animation.
Next, you'll want to duplicate the costume of the sprite and use the paint tools to add a new costume that appears to glow or be bioluminescent.
Now it's time to add Code to create a blinking/glowing effect. Click on the CODE Tab for your sprite. Drag out the following blocks of code.
This would be a great time to provide students with the block code Challenge 1 card and have them experiment with arranging the code. Don't forget to show them how to pull apart the code blocks and reassemble them in different order.
Once your students have created their own solution to this Coding Challenge #1, ask them to compare their solutions. What would happen if they changed the Wait Time to more or less seconds?
Finally, apply your new coding skills to create all 4 characters from the book.
These steps are also included as part of the Challenge 1 teacher guide . You can find additional steps to this Challenge in the previous blog posts.
Lucie's Notes and Tip: Younger students (K-2) might become the artists for this project, while older students (Gr 3+) could code the project or use Scratch paint tools to draw sprites. Adults or older student mentors (Gr 5+) could assist uploading hand drawn images from younger learners into the Scratch project.
You could have students complete a project with just 1 sprite instead of all 4 characters then create a collaborative Scratch project with the contribution of different students.
If students each created 1 animation, the sprites could be exported
(Right click and download) and also imported (or uploaded) into another Scratch project making it possible for a group of 4 students to each complete one part of this project.
(Right click and download) and also imported (or uploaded) into another Scratch project making it possible for a group of 4 students to each complete one part of this project.
Stay tuned for our next post which will walk you through Challenge Card #2 where we learn to add code that turns our Scratch project into a Guessing Game.
Originally created for CSTA-Vermont during Computer Science Education Week 2024

.png)
.png)
.png)
.png)
.png)
.png)
.png)
.png)

.png)

No comments:
Post a Comment