Sunday, January 19, 2025

CS Inspired by Literature #WAOTL Challenge 4 - Adding New BackDrops and Sound to Scratch projects

In my recent posts, I introduced a #WAOTL series where you and your students experience computer science by using Scratch to create and code an interactive experience with bioluminescent characters from the children's book "Whose Afraid of the Light" by Anna McGregor.  

Here are the posts in the series so far 

Today's post will introduce Challenge 4 where we will learn to add a new Backdrop and Sound to our interactive experience.

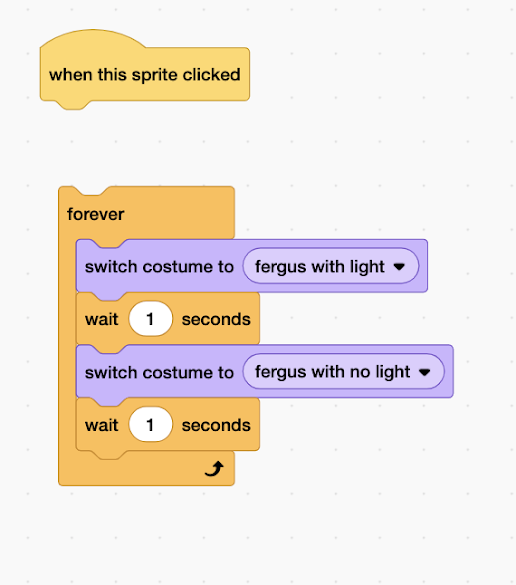
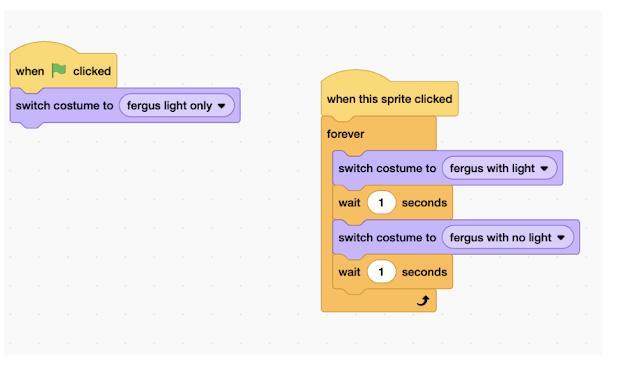
By completing this challenge you will  create confidence with code using the following blocks of code: 


You can start this project by using your own project from the last blog post or you can use this STARTER Project as a starting point.  Just click on SEE INSIDE and Remix. 

Let's get started by exploring the STAGE area in Scratch. The STAGE area allows you to create and code new Backdrops. You can find it in the bottom right hand corner.


When you click on the stage area you see that the top menu includes a place for you to add “backdrops” instead of costumes.  


You might have a plain default backdrop, or you might have a backdrop previously added to your project.   Since we want to add a new backdrop, click on the purple bar that appears in the lower left and select the Search (magnifying glass) from CHOOSE A BACKDROP. 


You'll get so many options for new backdrops already available in Scratch. I typed in "OCEAN" in the search area to narrow down my choices. Click on the backdrop you like best. (Of course you can always paint your own or import an image from outside of Scratch as a backdrop.)


Now that you have a new backdrop, let's add some SOUND and CODE it to start playing when you start your project.   I suggest you start by viewing this video from the SCRATCH TEAM  for a great 2 minute summary of the different ways to add Sound to your project. 

Now let's add SOUND to our project.
Click on the Sound Tab -  and then use the purple bar on the bottom left to CHOOSE a SOUND
.


I typed in WATER into the search bar to find a Water sound for my project.  You can hover over the sounds to hear them, but don't click on the sounds until you find one that you want to use in your project. 


For this project, I added a deep ocean sound clip to Scratch and coded it so that it would play ONE time when the project started. If you don't find the sound you are looking for, you could search for sounds outside of Scratch and chose the UPLOAD Sound option from the purple Choose a Sound purple bar.

Here are two sites where you might search for sounds that are free to use (However, when using these websites, a teacher will need to log-in and download those sounds for students).  


Now that we have added a sound, Click on the CODE tab to create a algorithm that will make this sound play when we click on Green Flag to start the project.  


One of the most frequently asked questions when working with Sound is " What is the difference between PLAY SOUNDS .. UNTIL DONE and the START SOUND block?"


Let's learn how to change the volume of the sound during a Scratch project. 


Another fun way to use Sound in Scratch is to RECORD you own sounds.   Select the Diver Sprite and I'll show you how useful this can be. 


Note:  The SHOW command included above  just makes sure the Diver is visible every time you start the project. 
I have had some teachers report that they have experienced  loosing sound files or experiencing unpredictable quality when using the sound recorder in Scratch.  If you experience this, I would suggest having students record using the free audio recording site called Vocaroo,  then Upload the sound file into your Scratch projects. 


Along with Google Slides you can use as a Teacher Guide for this Challenge which also includes a Video guiding you through the steps. 


Now that you know how to add Sound and change the Background, stay tuned for Challenge 5 where we will learn more about adding dialogue to our projects.     Challenge 5 will be the last in this short beginning series, but we are working on some BONUS Challenges were we will use Circuits and Circuits Boards such as Makey Makey, Fun Key, and Micro:bits that will be released in February. 


You can subscribe to this blog to get notified when the next challenge is posted.

Originally created for  CSTA-Vermont during Computer Science Education Week 2024

CS Inspired by Literature © 2024 by Lucie deLaBruere is licensed under CC BY-NC-SA 4.0


Tuesday, January 14, 2025

CS Inspired by Literature #WAOTL Challenge 3 - Adding and Controlling a Diver Sprite

In  my recent posts, I introduced a #WAOTL series where you and your students experience computer science by using Scratch to create and code an interactive experience with bioluminescent characters from the children's book "Whose Afraid of the Light" by Anna McGregor.  

Here are the posts in the series so far

Today's post will introduce Challenge 3 where we will learn to code a new DIVER sprite that you can move through the deep ocean with your arrow keys. The Diver will explore the 'balls of light' in the ocean to discover  the sea creature that each ball of light belongs to. 

By completing this challenge you will  create confidence with code using the following blocks; the challenge will be divided into two parts. 


Let’s get started by adding a diver sprite to your Scratch project from the last challenge.
Click on the purple Choose a Sprite bar and use the MAGNIFYING glass to search for a sprite from the library of sprites built into SCRATCH.  Type in the word DIVER and choose the one you want. 
You can resize the diver by changing the SIZE from 100 to whatever size you prefer. 
You can also drag the diver around the screen to position it to a new location.


 We will now Code the Diver by dragging out 4 copies of the EVENT block "When Space Key is Pressed. 
We would like to control the Diver Sprite with the 4 arrow keys.  You can do this by clicking on the little black arrow next to the word SPACE and selecting a different arrow key for each of these 4 Event Blocks. Your code blocks for the diver should look like this. 


Pull out 2 more blue code blocks


Does your code look like this?

Can you add code to the other 3 Event blocks so that the Diver moves
in the same 
direction as each arrow Key for each of the 4 events. 

Teachers might use an unplugged game to help the students learn how the POINT in DIRECTION block works. 


Now that you understand how to CODE an ALGORITHM when an EVENT occurs, 
 there are so many cool games and projects you can create.   
You are now ready for the second part of Challenge 3 where. you learn to use IF .. THEN logic.  

Let's change from coding the diver to coding one of your sea creature sprites.  Click on the sea creature sprite you want to code.  Let’s add some code to your  sea creature so that when the diver touches its light, the sea creature costume changes from "light only". to the costume showing the sea creature with the light on and  starts to blink.  

We’ll need to drag out this SENSING block, and change it from ‘touching  mouse pointer”to “touching Diver”
Make sure you are in the CODE section for the sea creature (not the diver)


Now let's add some IF .. THEN logic to our code. 


Now here is a challenge for you.  Your goal is to move the algorithm that made our sea creature blink inside the IF THEN block. 

Start by pulling  the FOREVER BLOCK. away. Look at your blinking animation code. 


See if you can rearrange these blocks so that when the Green Flag is pressed, the program is forever checking to see if you are touching the diver.  If the answer is YES to the question (Are you touching the diver) then the sprite should blink.

Chat with a classmate and experiment.  This is called PAIRED PROGRAMMING and is used by computer scientists every day in their job. 


Test your program.  If you got it right.  Let’s code the rest of the sea creatures with the same code. 

Test your program again.  Debug any unexpected results.

Are you ready for another challenge?

What would you like to happen to your Sea Creature Sprite 
when the Diver is NOT Exploring (Touching) it?


Here is a sample  Scratch solution  to this challenge. Click "SEE INSIDE" to compare this solution to the ones you and your classmates have come up with.  Remember that there are many different ways to solve these challenges. 

What type of game play rules  might add in future lessons?  How do you know if you WIN or LOSE the game? What would you like to happen if you WIN or LOSE? 

What if you trade computers  with your class mates and see who can explore all 4 sea creatures first.

Congratulations! You have mastered some important computer science concepts that computer scientists use every day.  Stay tuned for Challenge 4 where we will learn to change the backdrop and add sound to our project. 


Here is a teacher guide to Challenge 3

You can subscribe to this blog to get notified when the next challenge is posted.

Originally created for  CSTA-Vermont during Computer Science Education Week 2024

CS Inspired by Literature © 2024 by Lucie deLaBruere is licensed under CC BY-NC-SA 4.0


Tuesday, January 7, 2025

CS Inspired by Literature #WAOTL Challenge 2 - Adding game play to our project

In  my recent posts, I introduced a #WAOTL series where you and your students experience computer science by using Scratch to create and code an interactive experience with bioluminescent characters from the children's book "Whose Afraid of the Light" by Anna McGregor.  

Here are the posts in the series so far

Today's post will introduce Challenge 2 where we will learn to code a simple guessing game using the character sprites from the book.  We will add a yellow light costume to our sea creature sprite. We will add code so that we can  display only the yellow lights when the game starts. When you click on the yellow light, the costume will change to a character from the book.


Here is a sample project solution for this challenge

Let's get started.
First -- Duplicate the costume with the light.


Add a bright yellow shape where your character glows. 

You should now have 3 costumes for your sea creature sprite.
(Name them so you know which is which. Repeat for all 4 sprites)


Drag out these two code blocks 

Put the blocks together so 
that every time you start the 
game the Fergus sprites switches to the light ONLY costume.


Drag out a new EVENT block - WHEN SPRITE IS CLICKED

Remember the flashing code you created in the last post?
Remove the When Green Flag clicked and replace it with your NEW EVENT block - WHEN SPRITE IS CLICKED. Snap it together.

Let's Test it!
  • Press Green Flag on your new Scratch project.
  • Do you only have a light? 
  • What happens when you click on that yellow light?


Let's add these two algorithms to each of our sprites!  


Ask students how they might add GAME PLAY to this Scratch project.

What if... you created a card deck with all the students hand drawings of the characters.  Students play a game where they draw a card and have to click on the correct "blinking light" to make that character appear. 
How might you turn this idea into a Classroom Game with the student Scratch projects? 


Lucie's notes: They might not have the skills to implement the game play that they imagine, YET!  But explain that new computer science algorithms are created every day by imagining a possibility and learning the skills to code what you imagine.  Encourage them to continue to the next challenge to learn more new computer science skills that can help them code the game they imagined. 

Note:  I imagined a ball that was blinking and showed up at different  random parts of the screen making it harder to predict where it would be next.  The skills to code this idea and your students ideas will come with time.   Have your students write their aspired game play on an index card and create a Vision Board for your projects.

Stay tuned for Challenge 3 where we will add a diver sprite that you can control with the arrow keys. 


You can subscribe to this blog to get notified when the next challenge is posted.

Originally created for  CSTA-Vermont during Computer Science Education Week 2024


CS Inspired by Literature #WAOTL Challenge 1 Coding an Animation

In  my recent posts, I introduced a #WAOTL series where you and your students might experience computer science by using Scratch to create and code an interactive experience with bioluminescent characters from the children's book "Whose Afraid of the Light" by Anna McGregor.  

Here are the posts in the series so far

Today's post will Kickoff the first of 5 challenge cards you and your students can use to create the interactive experience 


In Challenge 1 students will create and code characters from one of the 2024-2025 Red Clover Book Award nominees.


Here is a Sample completed project to Challenge 1  


Start by creating a NEW Scratch project at http://scratch.mit.edu

Your students may access Scratch in the following  ways depending on district policy. 
  • No login (Save projects to your own computer or Google Drive)
  • Use Scratch Teacher account to create student accounts which they supervise.
  • Students create their own accounts with parental permission. 


To start the challenge have your students draw one (or all four) characters from the book.


Your students can  draw a character from the book using the digital paint tools built into Scratch. The Scratch interface allows you to switch between Vector drawing tools and Bitmap drawing tools. 


Vector graphics in Scratch allow you to draw shapes that remain smooth and crisp at any size.The vector editor uses points and curves to define shapes mathematically.

Bitmap graphics in Scratch) work with individual pixels. the images can become pixelated when enlarged.

I like the the vector editor because it uses a layer approach to more easily change parts of projects when editing different costumes. However, the bitmap editor comes in handy at times also. Watch this 5 minute videofrom STEAMIST to see which tools  are available when in vector or bitmap mode.   I would suggest  guiding your students through an exploration of each of these tools 


Tip: When you are in vector mode you will see a button that says 
Convert to Bitmap.  
When you are in Bitmap mode that button will say Convert to Vector. 


Your students can choose to create hand drawings of the characters. I go over my workflow for this option in step by step details  in my previous blog post.

Now that your students have created or imported characters from the book in a Scratch Project...

Let's DIVE INTO CODING AN ANIMATION


I would encourage you to create your own sprites, but here’s a Scratch Starter Project you can use if you’d like to learn to code an  animation without completing the previous steps.  In this starter project, you will find 4 sprites already created by young learners, so you can dive right into learning to code an animation. 


Next, you'll want to duplicate the costume of the sprite and use the paint tools to add a new costume that appears to glow or be bioluminescent.


Now it's time to add Code to create a blinking/glowing effect. Click on the CODE Tab for your sprite. Drag out the following blocks of code.


This would be a great time to provide students with the block code Challenge 1 card and have them experiment with  arranging the code. Don't forget to show them how to pull apart the code blocks and reassemble them in different order. 


Once your students have created their own solution to this Coding Challenge #1,  ask them to compare their solutions.  What would happen if they changed the Wait Time to more or less seconds?


Finally, apply your new coding skills to create all 4 characters from the book. 


These steps are also included as part of the  Challenge 1 teacher guide .  You can find additional steps to this Challenge in the previous blog posts.


Lucie's Notes and Tip:  Younger students  (K-2) might become the artists for this project, while older students (Gr 3+) could code the project or use Scratch paint tools to draw sprites. Adults or older student mentors (Gr 5+) could assist uploading hand drawn images from younger learners into the Scratch project. 

You could have students complete a project with just 1 sprite instead of all 4 characters then create a collaborative Scratch project with the contribution of different students. 
If students each created 1 animation, the sprites could be exported
(Right click and download) and also imported (or uploaded) into another Scratch project making it possible for a group of 4 students to each complete one part of this project. 

Stay tuned for our next post which will walk you through Challenge Card #2 where we learn to add code that turns our Scratch project into a Guessing Game.


Subscribe to this blog to be notified when the next challenge is posted.

Originally created for  CSTA-Vermont during Computer Science Education Week 2024