During Computer Science Education Week 2023, I challenged myself to learn to code with Turtle Stitch - a coding environment that allows you to generate code that can be embroidered with an embroidery machine! This fits right into my belief that Creating Code You Can Touch is a highly motivating way to introduce computer science. Today's post will include some getting started tips for beginners when using TurtleStitch for the first time.
If you have used Scratch, Snap, or other block coding environments before, you will notice that the layout to TurtleStitch includes 3 main areas.
On the left you will find a library of CODE BLOCKS, on the right you will find a STAGE with a TURTLE sprite (or actor) and in the middle is where you write your CODE to control the Turtle.
Let's get started by dragging out some Code Block to see if we can make the Turtle draw a Square.
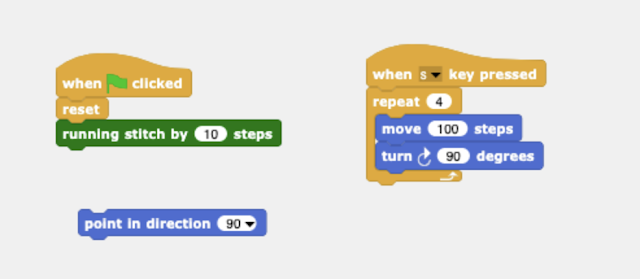
Tip 1: Start each program with a RESET. This clears the screen and returns the turtle to the HOME position and points it in the 90 degree direction. Then add a Stitch Type code by dragging out the Running Stitch Code. If you don't do this, Turtle Stitch will give you a warning that your stitches are too long for the embroidery machine. Putting both of these under a WHEN GREEN Flag block is a great way to make sure these commands are run at the beginning of every program.
Tip 2: I like to drag out an EVENT code that allows me to run part of my design when I press a key on my computer. In this case, I chose WHEN S KEY PRESSED (since we are drawing a square) then I attach code blocks that will tell the Turtle to Draw a Square.
Tip 3: Take some time to understand the X,Y Coordinates
One way to do this is to have TurtleStitch display the X,Y coordinates of your mouse pointer on the stage as well as the X,Y coordinates of the Turtle. I, also, like to display the direction that the Turtle is pointing.
To do this Find and "Click on "CHECKBOXES" for each of the following in the CODE BLOCK area.
Check these in the SENSING Category
When you do this, your Stage area will display location of your pointer and your turtle.
Moving the pointer around on the stage and watching the location info change can help you place your design elements in the correct elements on the stage. (Hint, You might have to drag the information blocks around the stage if they are stacked behind each other)
If you prefer to work in inches, change the Display Setting to inches.
Keep the size of your design small enough to fit into the 4 X 4 inch or the capacity for your embroidery machine
The maximum image size for the Turtlestitch stage area is approximately
3 1/2 inches in height x 4 1/2 inches in width
You can see the size of your image below the stage.
I found that 127 steps created a 1 inch square
Tip 5: Try this fun challenge to better understand the X,Y positions of your grid and the size limitations of TurtleStitch graphics.
Create a design that draws and labels the XY Coordinate grid on the stage. Make it about 4 X 4 inch in size.
Use the code blocks we have learned along with these code blocks.

Here is the approach I took to do this.
When GREEN FLAG pressed, reset and set a running stitch
When X pressed, draw the X axis and label it
When Y pressed, draw the Y axis and label it
When H pressed (move the turtle back home)

Bonus Challenge: Draw a one inch square in each of the 4 coordinates! `
Hope the following Tips prove to be helpful as you start your Turtle Stitch Journey.
I'm just learning too, so I welcome any advice as I share my journey in the next few posts.


No comments:
Post a Comment