As you saw in our last post, our Halloween station set up outside the bus in Desert Hot Springs, California included a DIY Jack O Lantern as greeter next to the candy bowl. It was an opportunity to refresh or learn some foundational maker skills.
Our last post highlighted the design of the pumpkin using Gravit and the Noun Project. We used the Cricut Maker to cut out some vinyl and cardstock and ended up with a base for our project.
My goal for part 2 was to spark a maker mindset with a little toy hacking. A great way to do this is to look around your house for some discarded toys - but since the bus is pretty minimalist living - I decided to stop in a few nearby dollar stores. My goal was to find some inexpensive novelty gadget that had LEDs and made sound or vibrated or moved.
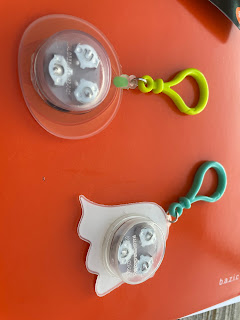
My guess from the slim pickings is that the current supply chain crisis was at play. But I did manage to find aa LIGHTUP mouth guard and a few clip on Halloween gadgets to break into. No sound ;-( No motion ;-( - but some fun lighting sequences ;-)
So the next step was to crack them open and see what I had to play with.
hmmm batteries, some LED lights and a switch
hmmm could I break apart the LED's and extend them further away from the batteries and switch?
ah found a piece of network wire I could use
An opportunity to practice soldering!
I've never been good at soldering, but since my cataract surgery this summer,
it became even more challenging
They inserted a new lens in my eyes where I can see far ... but
I can no longer see better when I get close to something
I have an idea
and of course some cardboard
ooooh - I found another blingy thing to hack into at the drug store
Also found a Harbor Freight nearby and picked up a few things including
some more Alligator Clips for prototyping and
a Third Hand with a built in LED lighting and magnifying glass
that helped with soldering
The third hand really helped with soldering
but I need a LOT more practice
Eventually I was able to solder a few wires to a small circuit board
that seemed to have a momentary switch on it that
ran some blinking light patterns for about 20 seconds or so
this allowed us to make really blingy eyes
for our Jack o Lantern
that could be activated with a paper clip switch
Not a bad toy hack considering the constraints I was working with.
But what if I wanted to keep the eyes blinking through the night?
hmmm perhaps adding a Microbit with some code
The Microbit also allowed us to add an animated mouth and some music
I love any excuse to create with code
and voila -
Meet Jack
our Halloween greeter
oh... and I also decided to put some fairy lights I had picked up to good use
for a quick costume change for myself
while Craig added some colorful solar lights to the bus
Happy Halloween
and
Happy Learning through Creating and Making


No comments:
Post a Comment